Ram Promaster Forum banner
21 - 40 of 94 Posts
Discussion starter · #22 ·
I decided to drop my solar panels down 1 ½" by using half height Unistrut. It worked out well and is 100% cleaner looking. I also put a flair on the front of the panels (actually 1" pvc electrical conduit cut in half. It’s just about exactly the same with as the solar panel frame. No test results mileage wise yet but I was as interested in the visual perception as much as increasing mpg

I had everything set to mount up on the roof in advance and a bribe of a free Chinese lunch to RD was all it took to get it up there. In the end we only spent 40 minutes on it so he got cheated out of his free lunch but I did get a donut out of him when he showed up!
Very nice!
So easy to add the PVC and has to be worth something on drag.

I'm about 60% into building a wind tunnel in my shop -- always wanted to do one :)

Gary
 
When KOV begins to get 18-20 mpg he will have to set aside some lunch money. He really didn’t need me. All I did was to bring the doughnuts and hand up the panels one at a time. Besides I got him to assist in a washing machine rebuild that took several hours about a week ago. Of course he got lunch. BTW the nosing on the panels looks like it will help. It may be lowering the panels may negate some of the advantage. KOV keeps good mileage records so after a few months the effect should show.
 
Discussion starter · #28 · (Edited)
Hi,
I've had another go at measuring the drag reduction one might get by adding fairings to roof mounted PV panels.

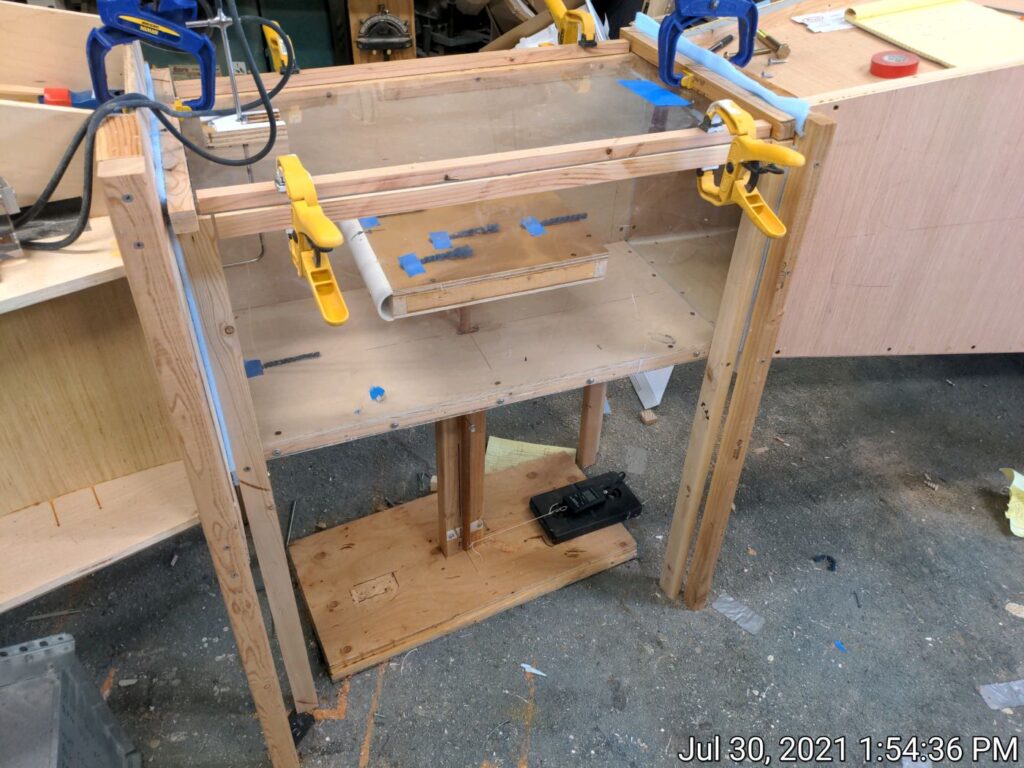
I went off the deep end a bit and built an actual wind tunnel - something I've always wanted to do :)

Image


A detailed description of the tunnel and how it works and some validation data are here...
Any suggestions on how to improve it are most welcome.

In a nutshell, the test section where the model goes is 13.5 by 13.5 inches. I would like it to have been a bit bigger,but the the length of the tunnel and the blower required push air through it get prohibitive pretty fast, and the 13.5 is enough to test parts of PV panels for drag. The tunnel has generally turned out well, with very consistent velocities and low turbulence in the test section. There are two not so great issues that are explained at the end of this post, and I'd like any advise anyone has on these two issues.

The model of the PV panel is 11 inches wide by 1.75 inches thick by 12 inches along the flow direction. So, the models are full scale in thickness, but smaller in area than the actual PV panel.

Image


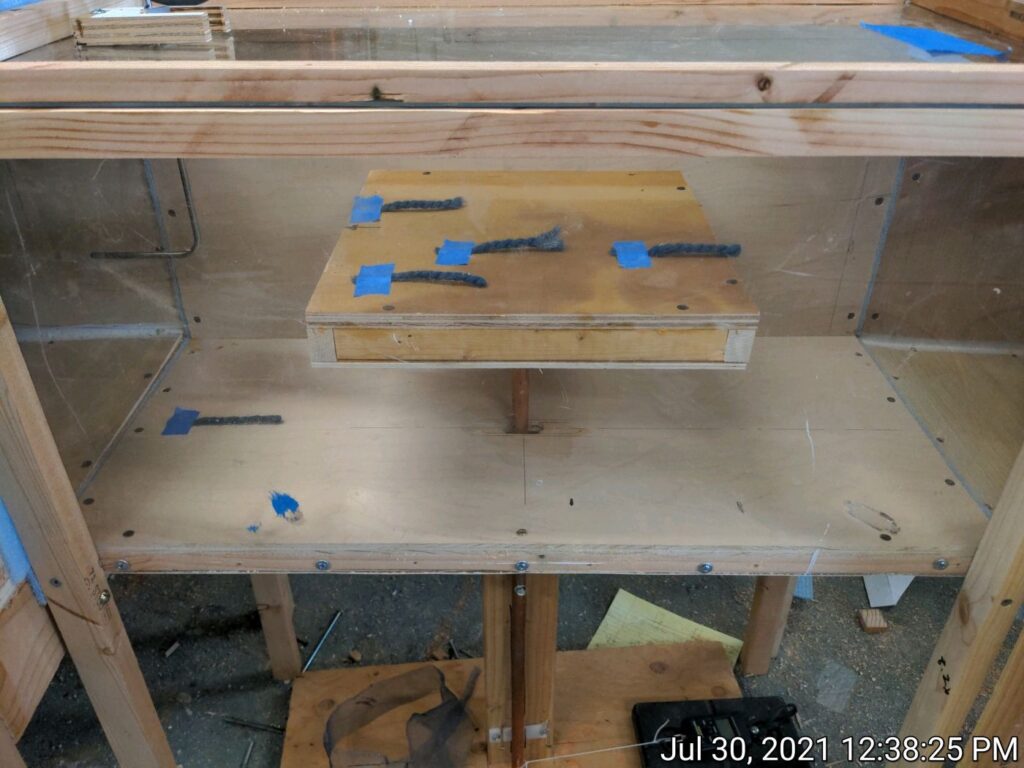
The test section with the PV panel model with no fairings "flying" in it.

The front of the model is a just a flat face (like a PV panel), but can have an elliptical fairing added to it, or a half pipe fairing applied to it.

Image

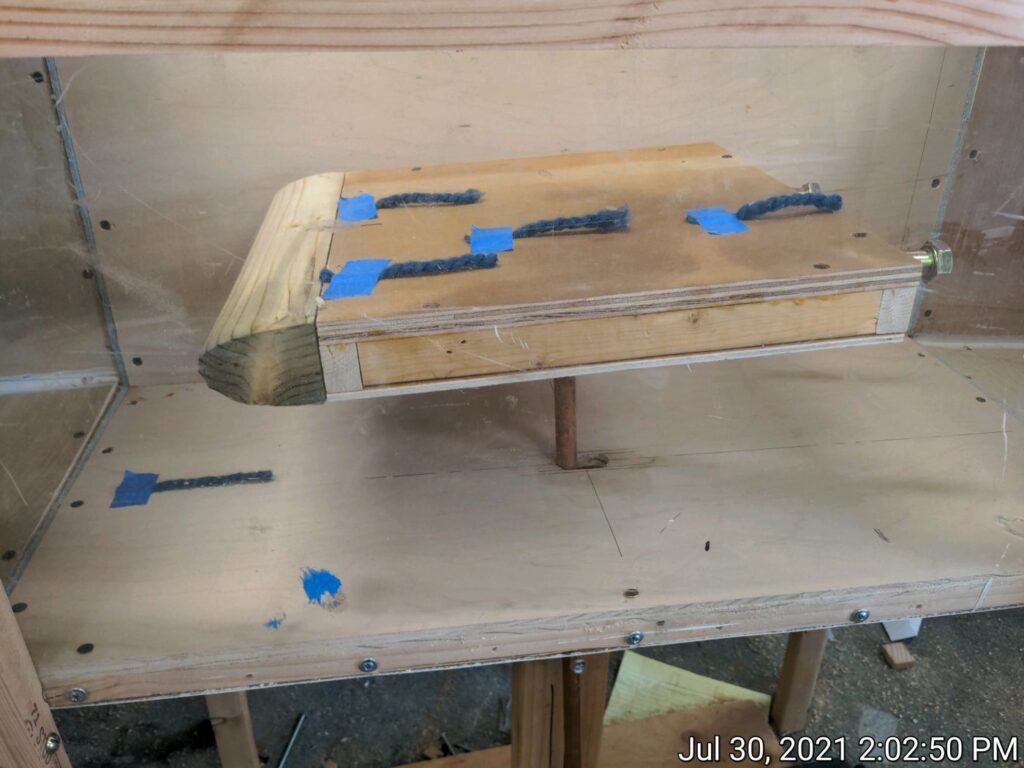
The PV panel model with the elliptical nose fairing attached.

The bottom of the panel is an open box (like a real PV panel), but a smooth bottom can be applied - this bottom replaces a spacer and adds no thickness.

The trailing edge of the test panel can have a 15 degree boat tail fairing added to it.

Image

The picture above shows the test section with the transparet side and top - the top is easily removable to allow changing or replacing the model. The model is supported on a rod which extends through the floor of the test section. The rod is supported on a low friction pivot a bit below the floor, and the rod continues downward for an equal distance with the force being measured by a digital fish scale attached to the end of the rod. Care is taken on each reading to make sure the model balanced fore and aft and that the rod is dead vertical (model horizontal). The air velocity is measured at start and end of each run using a pitot tube and manometer.

I also attached yarn tufts to parts of the models to try to get an idea of how smooth (or not smooth) the flow was with and without the fairings. I'll put these up on Youtube, but the results a just what you would expect -- the no fairings version shows lots of separated flow from the panel nose tail. With either the elliptical nose or half pipe nose, the separation is reduced to the point where it can't be seen in the yarn tuft movement.

Here are some sample drag force measurement runs

NoseBottomTailFdrag (lb)Fdrag 70-70 (lb)MPG change (%)Life GalsLife $'s
nonenonenone
0.83​
21.1​
-11.1%​
1235​
$4,322​
ellipticalnonenone
0.38​
9.8​
-5.2%​
573​
$2,007​
half pipenonenone
0.53​
13.5​
-7.1%​
790​
$2,765​
noneyesnone
0.55​
14​
-7.4%​
819​
$2,867​
ellipticalyes15 deg
0.23​
5.9​
-3.1%​
345​
$1,208​
ellipticalnone15 deg
0.36​
9.16​
-4.8%​
536​
$1,876​

  • First three columns show what kind of fairing was in each position (nose, bottom and tail)
  • Fdrag is the force measured on the model in the windtunnel. The windtunnel speed can vary about plus/minus 1 MPH from run to run, and these are all corrected to what the force would be at 35 MPH (a small correction in all cases).
  • Fdrag 70-70 is the model force scaled up from 35 MPH to 70 MPH and the panel width scaled up from 11 inches to 70 inches. This is an estimate of what the forces would be under real world conditions on an actual van. Since the drag goes up with velocity squared, going from 35 to 70 increases drag by a factor of 4.
  • MPG Change (%) is an ATTEMPT to estimate how much your MPG would change from a van with no PV panel on the roof. The methods is explained below.
  • Life Gals is the number of extra gallons you would use over 200K miles for a van that got 18 MPG before adding the PV panel.
  • Life $'s is the cost of the added gallons over the life at an average of $3.50 per gallon.
Important to note here that the MPG and gasoline columns are relative to a van with NO PV panel installed. The saving in MPG and gas is obtained by comparing the numbers on the top line (no fairing and 11% MPG drop) to the line for the fairing you are interested in.

The MPG change is calculated by taking the Fdrag 70-70 number and multiplying it by 5280 ft per mile to get the extra energy per mile needed to push the PV panel through the air for a mile. This is then divided by an ESTIMATED vehicle powerplant efficiency of 20% to get the energy input in added gasoline per mile. This is then divided by the gasoline use at 18 MPG to get the percentage change in MPG. This is obviously very rough - so, take them with a healthy bit of skepticism - maybe someone has a better way to do this?

I guess one rough conclusion is that the savings are so large that even if the estimates are way to high, its still worthwhile doing the fairing(s).

If the 21 lbs of force on a 70 inch wide, 1.75 inch thick at 70 MPH seems unreasonably high to you, envision taping an 11 inch square piece of plywood (same frontal area as PV panel) to your hand and then sticking your arm out the window at 70 MPH with the flat face of the plywood facing into the flow -- 21 lbs does not seem so unreasonable :)

If's, And's and But's

A couple of caveats on the windtunnel.
I had hoped to get the tunnel velocity up to 60 MPH to get more realistic highway speeds, but my blower setup can only manage about 40 MPH max. If anyone has any ideas for moving more air through the tunnel at a reasonable price, I'm all ears.

A puzzling thing is that when I try to validate that the wind tunnel is producing good drag numbers by back calculating the drag coefficient for shapes with a known drag coefficient, the ones I calculate are substantially higher than the handbook values. If anyone has any ideas on this, please let me know.

The tunnel tests full scale models of the PV panels in a free airstream, while the panels mounted on the van roof are seeing an airstream that is influenced by the van itself. Its not clear to me what effect this might have on the results. On the one hand, the air has to accelerate to makes its way up and over the van (like the flow over the top of a wing). On the other hand, the presence of the van roof surface below the panel may have a drag reducing effect.
In any case, the free stream drag reductions that the fairings accomplish are at least a clue as to what might be achieved in the real world case, and the savings are so large that even if the real world numbers are substantially lower, the benefits would still be large.
Thinking about a test on the van with a simple, full scale, 70 inch wide PV panel model mounted up close to the front of the van and 3 or 4 inches above the roof line. The results of this should be large enough to measure on a careful A, B, A actual MPG test.

Any ideas, suggestions, comments are most welcome.

Gary
 
As I said in the other thread where you mentioned this: You're amazing, as always, @GaryBIS!

I'm inspired to immediately create an elliptical fairing for the leading edge of my solar panels As I also mentioned in the other thread, my gas mileage isn't good (14.9 mpg) and part of this is likely my large solar array held aloft 2 inches above the roof; held aloft intentionally to create airflow under them for keeping the panels cooler and thus more efficient as well as to keep my roof cooler under the panels.

But after some long trips with such not-so-great gas mileage, I am now looking to improve mpg.

Your findings with simple to make fairings are very encouraging.

A few thoughts:
  1. I'm surprised the boattail at the trailing edge didn't do more.
  2. In real life, I am thinking solar panels are even draggier than your model, depending on how they are oriented. Mine, in particular, span nearly the entire width of my van. Your less wide section model could appear "more streamlined" in comparison.
  3. I mentioned in the other thread about how it may not be fully advisable to seal off (smoothen) the bottom of the solar panel because of how solar panels are affected by heat. But I do see the large benefit you've found by doing this. I wonder if there is a compromise. E.g. seal off just the first few inches of the bottom (so airflow is not so abruptly altered)? Or maybe seal off the entire bottom but cut out small strips front-to-back for vents in order to have at least some airflow or way for hot air to get out. Crazy thought: seal off the bottom entirely and install a 12V intake fan and an exhaust grate such that when the panel is creating electricity, siphon off a tiny bit to run the fan to keep the underside cool (many solar charge controllers have a "Load" output that is never used but which could be used for this; I'm assuming they aren't connected to the battery bank and thus don't draw power from them when the panel isn't creating electricity).
  4. Your puzzling thing: maybe there is turbulence still in your windtunnel section? Maybe in giant windtunnels the airflow smoothens out because they have the real estate and thus length to make the windtunnel section really long.
Once again, thanks for your efforts, Gary. Very illuminating.

Edit: left out a "not"
 
Great job again, Gary! The aerodynamics get way more complicated and highly variable when you factor in van/roof influence. But your little wind tunnel seems to do a pretty good job with panel shape alone. And even if the numbers themselves aren't perfect, their relative magnitudes should still be meaningful to some extent. Like you said, they seem to make sense.

If we set aside a bottom, since it may negatively effect panel temperature and efficiency, the elliptical nose seems to be the best single mod. Although the half-pipe is not far behind, and it's cheap, easy to construct, and quite durable. However, a 3-D printer could print an elliptical plastic nose in inter-locking sections.
 
Discussion starter · #33 ·
As I said in the other thread where you mentioned this: You're amazing, as always, @GaryBIS!

I'm inspired to immediately create an elliptical fairing for the leading edge of my solar panels As I also mentioned in the other thread, my gas mileage isn't good (14.9 mpg) and part of this is likely my large solar array held aloft 2 inches above the roof; held aloft intentionally to create airflow under them for keeping the panels cooler and thus more efficient as well as to keep my roof cooler under the panels.

But after some long trips with such not-so-great gas mileage, I am now looking to improve mpg.

Your findings with simple to make fairings are very encouraging.

A few thoughts:
  1. I'm surprised the boattail at the trailing edge didn't do more.
  2. In real life, I am thinking solar panels are even draggier than your model, depending on how they are oriented. Mine, in particular, span nearly the entire width of my van. Your less wide section model could appear "more streamlined" in comparison.
  3. I mentioned in the other thread about how it may not be fully advisable to seal off (smoothen) the bottom of the solar panel because of how solar panels are affected by heat. But I do see the large benefit you've found by doing this. I wonder if there is a compromise. E.g. seal off just the first few inches of the bottom (so airflow is not so abruptly altered)? Or maybe seal off the entire bottom but cut out small strips front-to-back for vents in order to have at least some airflow or way for hot air to get out. Crazy thought: seal off the bottom entirely and install a 12V intake fan and an exhaust grate such that when the panel is creating electricity, siphon off a tiny bit to run the fan to keep the underside cool (many solar charge controllers have a "Load" output that is never used but which could be used for this; I'm assuming they aren't connected to the battery bank and thus don't draw power from them when the panel isn't creating electricity).
  4. Your puzzling thing: maybe there is turbulence still in your windtunnel section? Maybe in giant windtunnels the airflow smoothens out because they have the real estate and thus length to make the windtunnel section really long.
Once again, thanks for your efforts, Gary. Very illuminating.

Edit: left out a "not"
Hi,

I think your solar setup with the wide panels facing the flow and the front edge of the panel being far forward is a really excellent candidate for at least a nose fairing. I think you would see a noticeable gain.
I think the gain would likely be enough to pick up on an A B A style MPG test -- it would be great if you could that kind of before and after test -- maybe use the procedure I used in this roof rack test...
It was looking at your solar setup that made me choose the 70 inch width of PV panel to scale up my model tests :)

I too have been surprised that the boat tail fairings have not been more effective. Don't really have an explanation.

I do think some form of partially covering the bottom of the PV panel would be worth looking at. It seems like the ventilation is more of an issue when stopped and parked in the sun, and its harder to provide ventilation then. When driving, it seems like fairly minimal ventilation in a cover for the bottom of the PV panel would be enough?
But, the easy big gain is probably some kind of nose fairing.

I do plan to try to add smoke trail flow vizulization to the the tunnel when time allows. My understanding is that the smoke trails require a very low turbulence tunnel to work well and show distinct trails, so that will be a test of how turbulence free my tunnel is.

Gary
 
Hi @GaryBIS

Fantastic Test !! Thanks You !!

The biggest surprise for me was how effective the “bottom” was at reducing drag. I thought it would be good, I just did not think it would be that good alone.

Here is one for you to consider that might apply to the trailing edge (not sure how sharp yours ended). In my world “got a heavy wing? Squeeze the aileron on the light wing side” - - Whaaaaatttt? Yup “Kutta Condition”


The other tweak might be a laminar elliptical leading edge - but probably small gains.

As you wrote, your testing / wind tunnel will provide a rough idea as on top of the van roof is another variable, but I think your results are quite telling of rigid panels & roof racks that are not streamlined and the probable mileage penalty for interrupting the PM’s airflow.
 
Discussion starter · #35 ·
I wonder what mileage might be gained by smoothing the bottom of the van?
hi,
There is a good book on car aerodynamic "Modifying the Aerodynamics of your Road Car", Edgar
He has a few pages on under body smoothing, and seems to think there is a lot to be gained
He has this table

77103


The underbody cover is the largest drag reduction in the table.
This is for sedans, but I can't help thinking the PM would benefit quite a bit from a good underbody pan. But, not a small job -- the one nice thing is that since its not visible, it does not have look pretty.

Maybe someone has an idea how this could actually be done?

Gary
 
hi,
There is a good book on car aerodynamic "Modifying the Aerodynamics of your Road Car", Edgar
He has a few pages on under body smoothing, and seems to think there is a lot to be gained
He has this table

View attachment 77103

The underbody cover is the largest drag reduction in the table.
This is for sedans, but I can't help thinking the PM would benefit quite a bit from a good underbody pan. But, not a small job -- the one nice thing is that since its not visible, it does not have look pretty.

Maybe someone has an idea how this could actually be done?

Gary
The rear axel might be easy for a LE.

Assuming a sheetmetal cover if the lower structural members are at a consistent height.
 
Use a 1/43 scale model and smoke placed with a venturi tube. By using a model you get a truer air flow the smoke lets you see the movement. You would need to add a black back wall to see the smoke. The ebay models seem to be 136" if you want a longer version you would have to buy two and cut and glue. This is the cheapest one today.
 
Gary, I wouldn’t spend too much effort with the smoke, it is hard to get good results. I too built a wind tunnel, amazingly similar to yours, maybe a bit larger our test chamber was 16” square. We were developing a marine ultrasonic anemometer and were concerned with turbulence at different angles of heel. Our testing was at lower speeds mostly 20-30 mph. We tried several different smoke methods and could never come up with useful data.

Your setup and methods appear valid to me. I appreciate your efforts and reports. Keep up the great work.


Sent from my iPhone using Tapatalk
 
Discussion starter · #39 ·
Gary, I wouldn’t spend too much effort with the smoke, it is hard to get good results. I too built a wind tunnel, amazingly similar to yours, maybe a bit larger our test chamber was 16” square. We were developing a marine ultrasonic anemometer and were concerned with turbulence at different angles of heel. Our testing was at lower speeds mostly 20-30 mph. We tried several different smoke methods and could never come up with useful data.

Your setup and methods appear valid to me. I appreciate your efforts and reports. Keep up the great work.


Sent from my iPhone using Tapatalk
Hi,
Thanks for the feedback!

If you have time to look at this guys approach to smoke, I'd like to hear what you think of it
He starts describing the smoke system at minute 8.

Also, wondering what you guys used for the fan/blower in your tunnel.

Thanks Gary
 
Hi,
Thanks for the feedback!

If you have time to look at this guys approach to smoke, I'd like to hear what you think of it
He starts describing the smoke system at minute 8.

Also, wondering what you guys used for the fan/blower in your tunnel.

Thanks Gary
Gary, The video shows much better results than we ever got. Our smoke generator was similar to what he uses but larger, part of our issue was trying to capture just a small part of its output. I like his method of pumping smoke into a reservoir then pressurizing that to push it out the delivery point. We just used a single delivery point but a series of them looks better. We tried a few different things but in the end concluded that the smoke wouldn’t give us any measurable data, but it would look cool, and we gave up. Like the guy in the video says, low speed works best.

We were testing full size working prototypes, so we could see from the data being output when the flow went turbulent. It was a fun project and we ended up with pretty credible results. This was actually the second wind tunnel I had built, the first was in college, it was for videoing birds in flight.

We used what I think was a 30” 3 blade fan and a 1 hp dc motor. With the pulley ratio we used we could get to about 40 mph.

Have fun with it. Jeff


Sent from my iPhone using Tapatalk
 
21 - 40 of 94 Posts