Ram Promaster Forum banner

Shiny's Build Thread

135K views 188 replies 53 participants last post by  SteveSS  
#1 · (Edited)
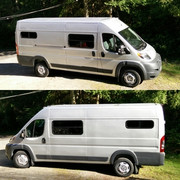
Time to start a build thread for Shiny. This will be my first RV build, although I've built houses and boats before. We've rented several RVs in Europe over the last 10 years and most were Fiat Ducatos. Those experiences cemented our priorities for Shiny, which are: a boondocking machine with a fixed bed, indoor toilet and shower, a small but functional kitchen, storage, and single fuel (no propane, all electric).

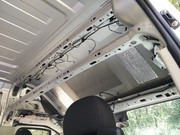
It's been ordered with factory swivel seats, UConnect 5.0 with backup camera, power mirrors, cruise control, leather-wrapped steering wheel, security alarm, 2 extra keys, aux-power connection, slush mat, mud flaps, premium HD suspension, wheel covers, 220A alternator, tow hitch, no badging (fleet option), and no windows. Motion Windows are on order. There will be one Maxxair fan centred fore and aft with solar panels at both ends (2+2).

We have a floorplan, which I'll post as soon as I make it presentable. In the meantime, I'll start with the basic electrical plan. I have most of the large stuff already. I want to thank everyone for their input. I worked from Gary's diagram. It's an experiment at powering some high wattage equipment (e.g., induction cooktop, hot water heater (Isotherm Spa), and small portable heater (Caframo True North).
 

Attachments

#4 · (Edited by Moderator)
Floorplan 1.0

Image

This is our general floor plan. Utilities (batteries, fresh-water tank, Isotherm Spa HW heater, etc) under forward end of the bed (over the axle) and stowage space aft. Grey-water tank underneath the van. Half of the shower doubles as the hall to the bed; the other half doubles as parking space for a clothes drying rack (etc). The head is a porta-potti. Lower kitchen cabinets hold sink, fridge, and portable induction cooktop. Upper cabinets and table yet to be determined. MaxxAir fan above the shower, with a pair of 100W solar panels forward of the fan and another pair aft. We'll fine tune all this once we get the van around the end of April.
 
#183 ·
Floorplan 1.0

Image

This is our general floor plan. Utilities (batteries, fresh-water tank, Isotherm Spa HW heater, etc) under forward end of the bed (over the axle) and stowage space aft. Grey-water tank underneath the van. Half of the shower doubles as the hall to the bed; the other half doubles as parking space for a clothes drying rack (etc). The head is a porta-potti. Lower kitchen cabinets hold sink, fridge, and portable induction cooktop. Upper cabinets and table yet to be determined. MaxxAir fan above the shower, with a pair of 100W solar panels forward of the fan and another pair aft. We'll fine tune all this once we get the van around the end of April.
Looks good! My shower also doubles as storage. I put a closet rod in it, and I hang clothes in a suit bag. At the campsite I move the suit bag to hang on a rod in the cab. I have a teak shower mat and it dries really fast. For the first year I had a plastic mat and it was always wet, which was really unpleasant.
 
#5 ·
Very nice. One suggestion is to look into awning windows where the bottom opens as we love ours when we want fresh air and it’s raining or looks like it might by the time we get back from our walk (lunch, shopping, bike ride, etc......)
 
#6 ·
In case you didn't just forget to add it in the plans, I think you'll want to build a raised floor section for your feet to touch down when you have the front seats swiveled around. I plan to do this and probably also use it to put in a mount for a table leg/stand to go between both seats. You can also use it for storage or for house electronics as I've seen some do.

Sent from my SM-G930T using Tapatalk
 
#7 ·
In case you didn't just forget to add it in the plans, I think you'll want to build a raised floor section for your feet to touch down when you have the front seats swiveled around. I plan to do this and probably also use it to put in a mount for a table leg/stand to go between both seats. You can also use it for storage or for house electronics as I've seen some do.
Yep, that's in our plans, just not on this drawing. All the electronics go under the bed. We 'll use it for shoe storage, ala RD, MsN, and others. Possibly a table post-mount, too, but I'm really hoping for a swing table like post #15 here: http://www.promasterforum.com/forum/showthread.php?t=53658. I'll test the geometry full-scale once we have the van.
 
#14 ·
Here is the plumbing plan, so far. This part will definitely be a father-son project. He's a plumber.
Hi Steve,

Thanks for the plumbing ideas! I like how you linked the various parts, I think I will look at adding a strainer and pressure tank to my setup.

Shaun
 
#10 · (Edited)
I'm taking a slightly different approach. Neither the Ms or I are very good at crawling off the end of the bed w/o taking the sheets and blankets with us, and we don't want to crawl over each other on our nightly sojurns to the potty so we opted for a bunk bed solution. The Ms gets the lower bunk and I'm in the nose bleed section when she travels with me. Makes better use of space in the 136 WB. The top bunk hinges down to create a slanted back turning the bottom bunk into nice seating for 3 or 4 if we have company stop by for tea. Normally the bunks stay made up as beds.

I ordered the factory swivel seats. The cabinet behind the driver has a cantilevered shelf, (may decide to turn it into a shelf that folds down when not needed) to provide a table for the driver, and the passenger has a table that folds down and swivels out of the way when not needed. Floor is raised for about 18" so our feet don't dangle ala Edith Ann (if you're old enough to remember Laugh In). The raise floor space will be more storage.

This leaves large storage spaces and counter tops for the galley, under the bunk, and behind the driver. Most storage will be full extension drawers as I'm getting to old to get down on my hands and knees and reach back into low cupboards. At this point we like the open feel with no upper cupboards. This may change but for now we're going to see if we can do without.

The little round recessed steel cylinder next to the sink is a 1 gallon steam table drop-in that will be used as our trash can. The Ms worked in the restaurant industry for many years and she likes being able to scoop the mess down the hole in the prep table.

Porta-Potty is stowed in the bottom of the cabinet behind the driver.
 

Attachments

#13 ·
SSS,

Looking at the floorplan and thinking a bit more, I wonder....

Did you consider doing two beds on each side against the wall, and extending the hall up the center to the back doors? I have a similar setup on my 159 and it still gives me plenty of space for storage and a long area to walk in, get dressed, move long objects, etc.

My couches are 24" wide, and easily extend out into the aisle (hall) making them 30" wide. It's a pretty comfortable width for us for sleeping. Or with a slightly modified top, you could have 24" couches that extend across the aisle to get full 36".

Here's a picture of the setup: http://www.promasterforum.com/forum/showpost.php?p=321362&postcount=7

Just some food for thought... hmmm, food.... time for lunch!
 
#15 ·
Did you consider doing two beds on each side against the wall, and extending the hall up the center to the back doors? I have a similar setup on my 159 and it still gives me plenty of space for storage and a long area to walk in, get dressed, move long objects, etc.
Yes, we considered something like your setup. But having a permanent bed is a major priority for us. Among other things, we don't like making up a bed every night, and neither of us like couches. Weird, eh?

Funny story -- the last RV we rented in Europe had something similar to yours. Only the aisle gap was filled with a removable board held up by small aluminum brackets. The first time I climbed into bed, the brackets sheered off and I plummeted to the floor (I'm 190lbs). We slept in separate narrow beds for 4 weeks! And then McRent charged *us* 50 Euro in damages. It didn't affect our bed preferences though.
 
#17 ·
#18 ·
Thanks Steve. If you don't mind which strainer should I get for the Shurflo 131? The manual says to use Shurflo 255, but when I search I see many different versions of the 255. My pump also says an accumulator is not required. My pump: http://shurflo.com/rv-products/131-shurflo-revolution-pump-12-vdc-3-0-gpm
You and I have the same pump (131 = 4008). The various 255 strainers just have different connection fittings. If you're not sure, 255-315 keeps the most options open.
 
#22 · (Edited by Moderator)
Step 1: Sound Deadening

And here we go, finally!
Step 1: Applied Noico sound deadening. The recommended (approx.) 25% coverage on rear wheel wells, walls, and doors, but skipped the roof and floor. 36 sqft was perfect. Note, Noico pretty much requires a heat gun and roller, which we already had. BTW, we only found factory sound deadening in two places: centre of the "forehead" and at the bottom of the slider.

We can already hear the difference even without driving. The rear doors sound way more solid when you close them.

It was easy to temporarily remove the cab headliners and shelf. Besides adding some Noico, this will make insulating (Thermawrap) the forehead way easier. Everywhere else will get polyiso where it fits, and Thermawrap where it doesn't.

We'll be taking a road trip this week (without the van) that includes a stop in Vancouver WA to pick up our Motion Windows and a Maxxfan Deluxe. Those will be Step 2.

 
#24 ·
I was very happy with the noico difference also. I over did the wheel wells, but had a lot more to start with so I figured that was a good place for the extra. The doors definitely sound so much better. Less resonance/tinny. I still have yet to do over he driver area and the front doors.

Sent from my SM-G930T using Tapatalk
 
#25 · (Edited by Moderator)
Motion Windows Installed

We picked up our Motion Windows on May 30th from Peninsula Glass in the other Vancouver (Washington). We decided to order their standard PM windows before we had the van to measure. We have two half-heights in the back above the bed, a full-size in the slider, and another behind the driver. No windows in the back doors.

We are extremely pleased with the quality and solid construction. The screens even slide. However, it would have been nice to measure our van instead of ordering their standard PM dimensions. The half-heights are fine. They fit nicely after removing one small brace from our 159-Ext.

But the fit of the two big windows could be better. Both are extremely tight in the horizontal dimension -- too close for comfort. Yet, vertical dimensions don't make full use of the space. The slider is only about a half-inch shy, but the window behind the driver is 3+ inches shorter than it could be. Super close tolerances can be a real problem since factory openings are not always framed (welded) perfectly square. Only the slider opening is guaranteed square because it has a one-piece frame.

But hey, we got them to fit, and we love them!

 
#139 ·
Motion Windows Installed

We picked up our Motion Windows on May 30th from Peninsula Glass in the other Vancouver (Washington). We decided to order their standard PM windows before we had the van to measure. We have two half-heights in the back above the bed, a full-size in the slider, and another behind the driver. No windows in the back doors.

We are extremely pleased with the quality and solid construction. The screens even slide. However, it would have been nice to measure our van instead of ordering their standard PM dimensions. The half-heights are fine. They fit nicely after removing one small brace from our 159-Ext.

But the fit of the two big windows could be better. Both are extremely tight in the horizontal dimension -- too close for comfort. Yet, vertical dimensions don't make full use of the space. The slider is only about a half-inch shy, but the window behind the driver is 3+ inches shorter than it could be. Super close tolerances can be a real problem since factory openings are not always framed (welded) perfectly square. Only the slider opening is guaranteed square because it has a one-piece frame.

But hey, we got them to fit, and we love them!

This is great info. Thank you.
 
#28 ·
Brilliant! Would you like fries with that burger?

I've been waiting to see some photos of your van! Steve, would shaving 1" off the width and adding 2" to the height make them about right? Surely Motion Windows must have a reason for making the stock windows the dimensions they are. Did you happen to ask them? In any case, they look great. I'll be getting the same set of Motion Windows for my van, eventually. Might even spring to have them installed while I'm down there.
I believe MsNomer had some issues with Motion's standard PM dimensions, too. Measuring your own van is the best way to ensure an optimal fit. If you can't do that (like us), my recommendation would be to take 1/8" to 1/4" off their horizontal dimensions (both slider and behind driver). Vertically, leave the slider as is (1/4" undersize) and add 2-1/8" behind the driver to make it 1/4" undersize. Of course, all that is based on their current standard dimensions.
 
#27 ·
I've been waiting to see some photos of your van! Steve, would shaving 1" off the width and adding 2" to the height make them about right? Surely Motion Windows must have a reason for making the stock windows the dimensions they are. Did you happen to ask them? In any case, they look great. I'll be getting the same set of Motion Windows for my van, eventually. Might even spring to have them installed while I'm down there.
 
#30 ·
I've got two of the Motion Windows (one behind the drivers seat and one for the slider). I installed the drivers side one last summer and I am doing the one in the slider today... just taking a break between my 2nd and 3rd measurements. Both of these windows should be a good 1/4" narrower. I was prepared for the tight fit on the drivers side after reading MsNomer's posts.

The height of the slider side window is good and the drivers side is the same as the slider but could be taller if you don't need them to match.

When I ordered them last year, I told them I thought they were too wide but was told that was the size many Upfitters were using. I think they just used the first "professional" order to set the size.

... now it's time to cut the hole.
 
#31 ·
I think they just used the first "professional" order to set the size.
I thought they would have nailed it by now. I recall Jeff insisting I must have measured wrong because they had supposedly affirmed that their proposed sized fit. Not!

My slider is shorter vertically than the other three. Nobody will ever see both sides at once.
 
#32 ·
I posted about the MW stock sizes a while ago. On the phone they did in fact tell me the stock sizes are the first up fitter order they did. They also said they would make them any size you want for same cost. They can use either hole size or outside trim ring measurement. So measure before ordering and make it as big or small as you want. I wouldn't try to make it squeak into the area as that requires a precise cut with sufficient space from the surrounding braces.
 
#33 ·
Totally agree. If you have your van already, you should definitely order based on your own measurements. However, given their build time of 2-3 months, we decided to order before we took delivery of our van. We were aware of the risks given earlier experiences on this forum. Thankfully, it worked out for us, but those horizontal dimensions were definitely squeakers and provided some tense moments. Can't stress enough that we are extremely happy with the quality and strength of the windows. They do great work.
 
#34 ·
When I asked Motion Windows about changing the width of the windows they told me they would alter them for an extra $50 a window and that they had never before heard of anyone reporting the windows were too wide. lol.

I really want to be able to start building as soon as I take possession of my van and windows are a first step, so I think I'm going to go ahead and order their stock windows. Seeing how most of you have been able to make them work I'll take my chances that I can too.
 
#37 ·
When I asked Motion Windows about changing the width of the windows they told me they would alter them for an extra $50 a window and that they had never before heard of anyone reporting the windows were too wide. lol.
I really want to be able to start building as soon as I take possession of my van and windows are a first step, so I think I'm going to go ahead and order their stock windows. Seeing how most of you have been able to make them work I'll take my chances that I can too.
LOL is right! I guess it depends on who you talk to @MW. After installing mine, I spoke with Tim Williams @MW and he thanked me for the feedback. I also just remembered emailing Jeff Kemp @MW last December well before ordering ours. He said height was fixed (due to body curvature) but width can be adjusted. Emat, message me if you'd like to come take measurements off our 2017 PM. I can also email you their dimensional drawings for our windows.
 
#36 ·
Yea, stock size will fit, but if you really want different I would haggle because they were adamant with me that altering size was easy and no additional cost. That was 2 years ago. Awesome quality and function. If you don't want awning these are wonderful. You can get cheaper but not better imo.
 
#39 ·
Two years ago, height and width were adjustable to 1/16". In retrospect, I think I was a guinea pig, given that they appear to have adopted the measurements I insisted on. I remember calling Jeff when I got the final email with the notation that measurements were +/- 1/8". I said, "Jeff, -1/8" is OK. +1/8" and they are not gonna fit."