Ram Promaster Forum banner

Lift Kit

62K views 77 replies 37 participants last post by  Beckydolittle  
#1 ·
#2 ·
Same idea as those ones on eBay, but metal. $300 is a lot for that, but he's first in the game in the USA at least.

Pretty sure the ones on eBay from somewhere In Europe are a type of polymer/plastic because I read one review that said they were a little "soft."

Anyone who has seen how these all go together care to say if making one of these even thicker would pose a problem.? Say 2" or 2.5" thick and then a small lift in the rear to even things out.

Sent from my SM-G930T using Tapatalk
 
#9 · (Edited)
I think the main purpose is lifting not leveling. For $1 you can level the van. Just remove the secondary spring in the rear. Oh the $1 is for the two new grade 8 bolts needed for spring center bolts.

Yes I did read the thread title.
 
#11 ·
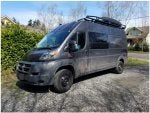
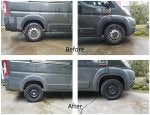
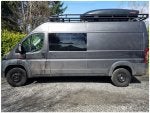
This type of spacer (fitting between head of strut and strut mounting location) is a pretty common thing for some other vehicles. There are, for example, numerous versions available for Subarus, and I have seen a couple for Toyota Siennas. Great debate rages on how much is too much . At some point - presumably a different point with each particular vehicle - you get into issues with the CV joints because of the altered angle, or the tie rods, etc. Having looked around at many opinions of the various amounts of lift achieved on Subarus, I can say there is not much consensus on the top end - some folks claim 3' or even 4" works fine, while others balk at anything over 1 1/2". With the Subarus, there are a lot of these kind of lifts on the road, and it seems like the smaller lifts, 1 or 1 1/2", are pretty widely accepted, the 2" fairly so, and beyond that the serious arguments begin, and/or the serious related modifications to avoid problems. Materials and precise configurations do vary with the ones I've seen for other vehicles, with some units having geometry built-in to compensate to some extent for the altered angles produced by the lift, while others don't have that. The Van Compass units have a different fabrication method than any others I've seen, but principles are exactly the same, and these are the simplest sort, where it is just a straight shim, no offsets to the side or angles involved.
Another point, though probably not very applicable to a van, is that while these shims do not compress the springs and thus do not reduce spring travel so that you bottom out sooner, they can do the opposite; if the strut is lowered enough you can reach a point where the a-arms hit bottom before the strut is fully extended and thus you can "top out" on a rebound or a dropoff. Like I say, probably not an issue with a van as few people are going to drive one of these aggressively enough to encounter the situation, but I though I'd mention it because I've seen it discussed in relation to this type of lift on other vehicles.
 
#14 ·
Our kit is a lift kit. It lifts the van 1.5" - It levels most light to mid weight vans. We are working on a rear lift to match the front.

The VC spacers are built with camber correction to make up for the lift height/geometry change. Hard to tell from the pictures on our site. Adding spacers to the top of the strut does not increase the spring rate or make the ride harsh. It creates a true lift. The bump stop built into the strut is lowered down with this method. This keeps larger tires out of the fender sheetmetal when the suspension compresses. The Spaccer kits and others that require the springs to be compressed to fit under the strut bearing cap just raise the ride height by increasing the preload on the coil spring. The bump stop is not moved.


Link to installation instructions -->

https://cdn.shopify.com/s/files/1/0871/7220/files/1025-INST-V1.1.pdf?11605541050093205182
 
#21 ·
I just finished installing the Vancompass front & rear lift kits - my local tire shop did the work.

Here are some before & after photos. Its more noticeable in person - hard to show in photos.

Great kit - and the alignment adjustments were minimal before/after.

I'm still running the stock tires: 225/75/16. I plan to upgrade them next year - likely to 245/70/16. The before pictures are my snow tires.
 

Attachments

#24 ·
russian lift spacers

So I ordered myself up a pair of russian spacers on ebay and they have arrived. I looked over the intructions from van compass for their product and figure that these spacers should install in aproximately the same maner. Can anyone who has used the russian spacers confirm this? I'm having my local mechanic install the spacers. I turn a wrench on my VW's but this project looks like it takes quite a bit of the front suspension apart which makes me nervous. Frankly, it makes me nervous to have my mechanic do it. Anyone who has used these spacers imput would be appreciated?
 
#25 · (Edited)
Just finished installing the Van Compass front lift today. Got exactly 1.5" lift, as advertised.
This is not a job for the faint hearted, although any competent mechanic with the right tools can do it.

The two most difficult parts: First, removing the calipers - no kidding. They are mounted to the steering knuckles with 12mm fine thread allen bolts that have some serious thread locking fluid applied. Fortunately I have a set of Snap-on allen wrenches and the 14mm one was able to withstand the 12" cheater I had to use. I doubt a chinesium allen wrench would have survived. It's tight quarters and the wrench/cheater can only swing about 1/6th turn. That's a lot of strenuous effort to remove a bolt, and there are 2 per side. I got a 1/2" drive 14mm allen socket (?) before attacking the other side. So don't try this job without a proper 14mm allen wrench.

Second, after hanging the strut-with-spacer from the chassis and getting it and the drive axle engaged in the steering knuckle (not too bad), the real wrestling match begins. Levering the a-arm downward while compressing the strut upward to get the ball joint stud into its hole in the a-arm is quite difficult. I used coil spring compressors to reduce the effort, but it was still a bear. There might have been some cursing.

Don't be surprised if either axle pops out of its inner spline during the wrestling match, but you can pop them right back in. The driver's side will spill gear oil if it pops out.

Oh, and installing that last T25 screw into its hole in the right front corner of the glovebox also brought out some colorful language.

I did one side at a time, on a lift. First side took about 6 hours, with a good helper. Second side about 4. Next time I could do both in a day.
 
#26 ·
I have the 40mm Russian spacers installed by my friend who is a mechanic, and I helped do some prying. Pretty simple job for him and it took about 2 hours. We did have to make a run to the hardware store for replacement bolts as the ones that came with the kit were either too short or too long, I can't remember. Very happy with the results, and I had it aligned afterwards to make sure everything was golden.
 
#27 ·
russian spacers

good to hear that it only took about 2 hours to install your spacers. did you do install in a similar maner to vancompass spacers? I imagine process is almost identical just different spacers. ? I have the spacers but am still on the fence on having it done. I just see complications and problems if everything is not put back just right.... Is the 1.5" worth the possiblity of disaster later? Still on the fence. I have a guy who says he can do it for me but I'm not sure I trust him to do job right.
 
#28 · (Edited)
So, after installing the VC lift I took the van to Les Schwab to have the toe-in adjusted, per VC's suggestion. Of course, they did a complete alignment inspection and informed me that I had to "take the van back to ProMaster" because the caster and camber were off and the only way to adjust it was to move the front sub-frame. Apparently that requires unbolting the engine and supporting it a special fixture (which only the dealers have) while the adjustment is made! They also said the rear alignment is off, which they also couldn't fix. After all that they refused to adjust the toe-in (which was off) because "if we can't do the complete job we won't do any part of it". Arrrgh. I have an appointment with a different shop on Monday to get the toe adjusted. Stay tuned.

On a different note, the van now has a definite shudder on moderate acceleration between 5 & 15 mph, or so. It is a bit worse if turning while accelerating. Feels like rear tire imbalance as I can feel it in the seat, but not in the steering wheel. I got all 4 tires rebalanced, but no improvement. I fear the additional u-joint angularity from the lift is causing this, although VC claims the u-joints remain within safe working limits. I believe I've read all the posts from those who have installed the VC lift, with no mention of this issue. Anybody?
 
#32 · (Edited)
What U-joint are you thinking has an issue. Do you mean the CV joints? Im pretty sure it's not enough of a change in the angle to cause an issue. Lots and lots of people have done the spacer installs without CV joint issues. Also you can't adjust the camber by moving the subframe, and if there was a change in castor it would not be adjustable anyway. A more competent shop would be able to get it where it should be.
 
#54 ·
For us new to the Ram ProMaster world who love being "higher up" while driving is there anything you recommend to accomplish a "lifted" position--short of the "traditional off-road lift". I love how the higher view I have experienced sitting in a sprinter (especially the 4x4) It sounds as if you speak from knowledge as to lift kits being not desirable, can you shed some light on why it is ill advised?
 
#33 ·
Excellent thinking John! Lift kits are nothing more than "window dressing" on a Promaster (although no one who has actually done it will want to admit) IMHO ;)

I have driven my Promaster over some of the roughest, rockiest trails you could imagine and NEVER (let me repeat - NEVER) had any clearance problems. It's throwing money out the window, nothing more.

PS - this is my own personal opinion, of course - others may and will disagree (vehemently) ;)