Starting to work on my bed platform and could use some advice.
Quick background:
![Image]()
![Image]()
Quick background:
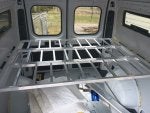
- I need a LOT of garage space under the bed, so I’m building it much higher than usual (~50–55" high).
- I want it to be simple, sturdy, and as thin as possible to maximize garage height.
- Use steel tubing and notches (photo below for reference).
- Attach a sheet of ¾" plywood to the frame with self-tapping metal screws (screwed into horizontal and vertical pillars).
- Add a 2x4 with notches
- I’ll also have a bulkhead that will help strengthen the platform.
- Will the self-tapping screws into steel pillars hold the weight?
- Will the ¾" plywood hold the weight?
- Will a 2x4 be strong enough?
- Will the size of the steel bars (using 5 of them: 1-1/4 in. x 6 ft. Steel Tube, 18 gauge.) support the weight?
") This is a Black Widow brand.
This is a Black Widow brand.