Ram Promaster Forum banner

High Bed Platform Build – Need Advice on Strength and Materials

4.8K views 35 replies 24 participants last post by  michelemoreno  
#1 ·
Starting to work on my bed platform and could use some advice.
Quick background:
  • I need a LOT of garage space under the bed, so I’m building it much higher than usual (~50–55" high).
  • I want it to be simple, sturdy, and as thin as possible to maximize garage height.
Here’s my current plan:
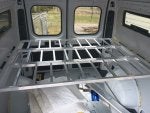
  • Use steel tubing and notches (photo below for reference).
  • Attach a sheet of ¾" plywood to the frame with self-tapping metal screws (screwed into horizontal and vertical pillars).
  • Add a 2x4 with notches
  • I’ll also have a bulkhead that will help strengthen the platform.
Questions I have:
  • Will the self-tapping screws into steel pillars hold the weight?
  • Will the ¾" plywood hold the weight?
  • Will a 2x4 be strong enough?
  • Will the size of the steel bars (using 5 of them: 1-1/4 in. x 6 ft. Steel Tube, 18 gauge.) support the weight?
I’m open to other ideas too. Would love your thoughts—especially since it’s a bit taller than most builds. Thanks!
Image
Image
 
#2 ·
My build was centered around 2 must haves for me.
1. My MTB will be in the van mounted to a 5' roller bearing slide out tray rated at 500LBS (over kill but HD) (front wheel is removed/hyd seat post dropped))
2. I want to sleep on a 6" memory foam full size mattress

Keep in mind, there is only so much room from the bottom to the top on the van. Subtract the thickness of the flooring and the ceiling and that's what you have to work with.
I checked measured from the top of my flooring (with sound deadener and insulation) to the bottom of my bed platform, it's 33 7/8 and it's 33" from the top of the sliding tray to the bottom of the bed platform. From the top of the mattress, it's 30" to the ceiling which leaves enough room to sleep in. (I set it up to sleep sideways)
The bed sides are 8" high giving support and I used 2X4 across which is plenty strong for what I need. Using metal increases strength I'm guessing but it also increases weight & costs.
You will need some way of getting in & out of the bed being it's so high so incorporate that into your plans.

Personally, those 2 features make my van perfect for me and all the other stuff is just that. A great nights sleep and safely stored bike. Win/Win
 
#4 ·
Hi Jing - thanks for the response. My concern is that my platform (steel rods) will be much higher than yours (like halfway up your window). Will the wood and screws hold in this higher position being so far away from the bolted horizontal pillar? and secured to an almost "fake" pillar?
Image
 
#7 ·
Yes, I would not touch the vertical stiffeners or sheet metal. The easiest may be to make plywood wheel well boxes to support the bed, I think @SteveSS and @RV8R for instance have such designs? If you bolt them to the horizontal beam and let them transfer the weight to the floor they will be very stable regardless of height.
 
#10 ·
I'm not a big person (155#) and I built my removable bed with 3 x 1" thin wall box aluminum with a 6mm (1/4") platform. Sure, it flexes a bit with both my partner and me bouncing around on top, but it is plenty strong. I.e. don't over engineer the platform! A little give might make it more comfortable :) The top is 29" above the floor + 5" Lucid mattress (Amazon) best sleep we ever have. The mattress spreads the point loads of your body (elbows, butt, knees) so there is absolutely no reason to be using 3/4" plywood. Yieesh! Make sure you can sit up comfortably on your bed. It is a good place to read...

I transfer the load to the floor with my wheel boxes, which are large enough to hold all my electrical stuff on one side and water stuff on the other. The boxes bolt to the horizontal beam that is ~30" above the floor. That also makes the removable portion of the bed only ~4" wide which might be why I get away with thin wall and 1/4" ply. Being able to quickly remove the bed and platform is pretty handy with getting construction and gardening supplies :)

I like the idea of 3/4" ply support bolted to the horizontal and vertical ribs (or a single 2x4). Otherwise wheel well boxes to contain all the bits and pieces you don't want stuff falling into like the electrical stuff.

 
#14 ·
Hi Alaska,
I'd suggest you mock up the platform at the height (including mattress) you are thinking about and see if you can sleep in it comfortably.

Nothing worse than a bed that is not comfortable to sleep in.

Gary
I agree with Gary.
My van, I designed bed height around two full sized bikes. After 1 year no more full sized, switched to folding bikes and lowered bed height 3 inches. Original height it felt claustrophobic, could not sit up, moving across partner was tough, air circulation was poor with bedding. 3 inches is a huge difference.
My frame is supported north south from across back door steel to a 3/4 plywood bulkhead with 1x1 screwed a glued framing supports very strong.
 
#13 ·
Mr. Hammock here once again suggesting that if you sleep solo you don't need a platform bed. Of course you should also test if a hammock is comfy for you to sleep in. Given the height of the platform the OP is stipulating a hammock could very possibly be strung high and tight enough in a 159 to be above that height when deployed. I love that a hammock doesn't require a level van for comfort and if clipped in with carabiners it can be deployed or stored very quickly.
 
#16 · (Edited)
#26 ·
Piling on to the loading ramp design/build... I used the Harbor Freight house brand. I also created the option to strap them in (not shown in the pic) rather than bolting so that the conversion to haul, say a refrigerator, can be done in 2 min. Here's a pic of my build - was dry-fitting the bike fork mount and T-slot channel locations:
 
#29 ·
IKEA beams are working good so far. https://www.promasterforum.com/posts/870405/

I put rivnuts into existing holes and some new holes, bolting plywood and 1x4 aspen to the van, with IKEA brackets mounted to those. I made two height levels. Before you commit to 1x2 or 1x3 square steel tubing (1/8"wall?), do a price check. Steel is not getting any cheaper.

The IKEA SKORVA beams are very nice and light, but perfectly strong for a bed, they are well designed. And they are $15 each! The brackets are probably still free, ask in store for them. LUROY Slats (two rolls) are $50 for queen bed, probably less cost than plywood, and definitely lighter.
 
#33 ·
You just need to transfer the weight of the bed to the waist of the van or the floor. I have a second bed that slides down on rails from the ceiling supported by blocks built out from the waist.

Image


I highly recommend placing the bed absolutely no higher than you need. The difference between sleeping comfortably and feeling like you're in a coffin is a matter of a few inches. The last thing you want is to have finished your build only to find out that you can't sleep in your bed due to claustrophobia with your ceiling.
 
#34 ·
My build is a little shorter/lower than yours.
I’m hauling dirt bikes under the bed. The bed platform uses skorva/ikea rails hooked onto 1x1 aluminum u-channel that is rivnutted to the wall and the sheet of 3/4“ plywood.

It can be quickly broken down or set up.
I’m still in the setup phase, getting ready for my first trip in a week or so.

Good luck!

Image


Image

Image

Image
 
#35 ·
Also, it's a good idea to factor in whether you'll ever be sharing the bed with someone. A comfortable height gets a lot less comfortable if you need to climb over your sleeping partner to use the bathroom.

Just make sure you build it as low as you can while still fitting everything into your garage. You'll never regret having too much headroom.
 
#36 · (Edited)
+1 on the aluminum ATV ramps. And to solve the bed height issue, we put our bed frame on linear actuators, so can easily adjust height (see the attached video below) depending on whether our bikes were in the back or not. Also made it much easier to have more space when loading the cargo area or working on the electrical system.


Image


During the build, before we had finished the 8020 framing:

Image


Image


Video of raising the platform with the press of a button:


The vertical supports of the actuators do need to be stabilized. I had planned to frame them in directly attaching them to the 8020 frame, but since we weren’t able to get them perfectly plumb we found that the did have to move left/right ever so slightly as the bed was raised/lowered. So ended up using tie-down straps that we adjusted the tension on as needed.

Purchased the linear actuators online from Progressive Automations. We sold this van because we wanted a larger one and the new van was already built out, and this is by far the #1 feature that I miss!