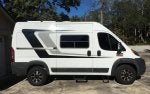
I bought my 2014 Promaster in May of 2017. It was stark white and completely empty when I got it. I spent about 5 months working on it (along with my regular job and also performing weekly with my band). It was quite and adventure building it, I give LOTS of props to friends here on the forum for sharing their experiences. This van was built for my band as a travel dressing room/hang out area and quickly became a mini-camper/beach-mobile once my wife and daughter threw in their ideas too! We have camped out a couple times since it's completion and have really enjoyed it. I was able to include every "want" I had on my list for a dream band van, plus lots of extras, so this works perfect for my situation. I have no intention of living out of it, so it might not work for everyone. Thought I'd share my finished project nonetheless. Hope you like it! Let me know what you think.
Here's a link to my YouTube van tour for more details on my build: https://youtu.be/G9EzlGKTcfk
Here's a link to my YouTube van tour for more details on my build: https://youtu.be/G9EzlGKTcfk


 Lesson learned, put the web cage up the next week and haven't had a problem since.