

I did some tests of the insulation types commonly used to insulate van conversions. It seems like there are so many claims and opinions on the best type of insulation to use in van conversions, that some actual data might be helpful to people trying to decide (the other factor is that I’m Covid bored and really needed a project to work on).
![Image]()
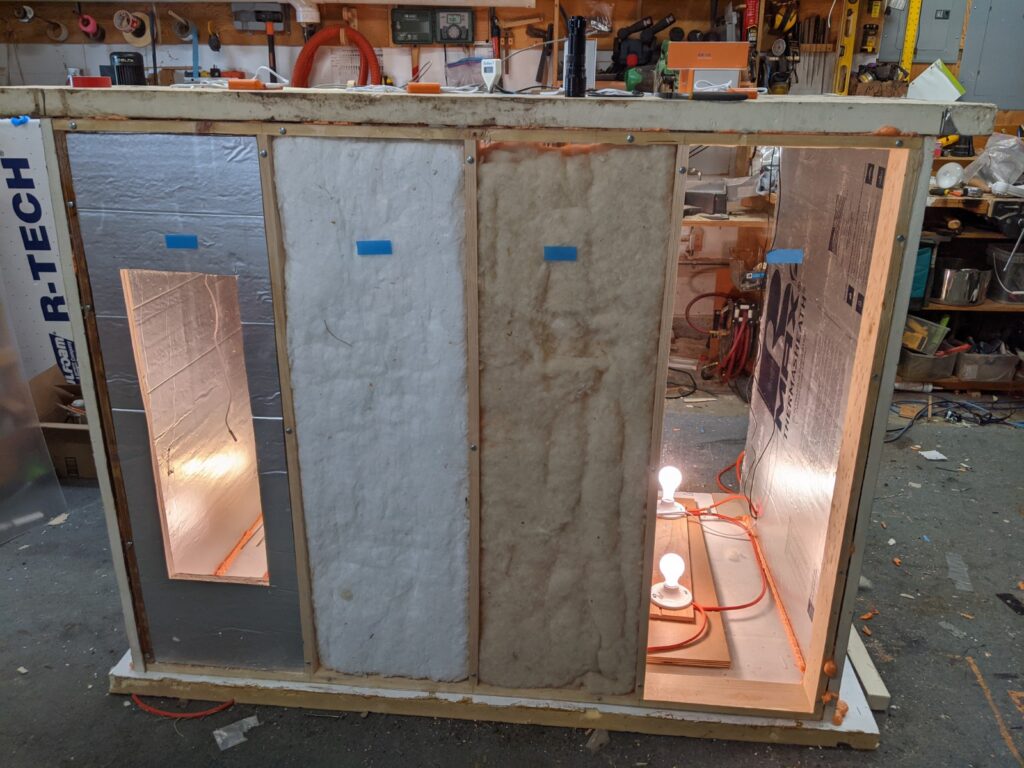
I used this test box in which the temperature and humidity can be controlled. It has 4 bays that allow insulation samples to be installed and their performance compared side by side.
For this test, left to right, its Polyiso, Thinsulate and Wool plus bay with no insulation.
Mostly I was testing for how the insulations handle moisture and condensation, but also some IR pictures to compare thermal performance and have also started a mold test.
This is quite a bit of data and all the details are here: Insulation Testing – For Van Conversions – Build A Green RV
But, some highlights below...
The first test compares Wool, Thinsulate and Polyiso.
The parameters that are measured and logged during the test are:
Generally a test run starts by weighing and then installing each insulation sample in its own bay. Then the inside of box temperature and humidity are set on the controller. The test is then run for a time roughly equal to a night in an RV. Photos and IR pictures are taken once in a while during the test to record condensation levels and see if there are any changes in thermal performance. At the end of this period, the insulation samples are weighed to get water pickup, and then quickly reinstalled. Then the humidifier is turned off while the heater is left on, and ventilation is increased to get a warm and dry environment in the box for drying. The test then continues until all of the insulation samples have dried out, and a final weight of each sample is taken.
Condensation:
The main goal of the test was to see how much condensation forms for the different insulation types both on the cold van wall and in the outer layers of the insulation. To test this, the box was kept at 70F and 70% relative humidity for about 14 hours - kind of a typical camping night. Outside temperature was about 40F.
The front wall of the box is made from Plexiglass so that the condensation can be directly observed.
Here is one set of pictures that shows the extent of condensation near the end of the test.
This is the Plexiglass with no insulation and the Wool insulation:
![Image]()
Plexiglass on right and wool on left.
This is the Thinsulate and Polyiso at the same time:
![Image]()
Thinsulate on right and Polyiso on left.
The Plexiglass of course forms lots of condensation (like a window on the van), the Thinsulate is next with quite a bit on condensation on the Plexiglass and in the outer part of the Thinsulate batt, and the Wool also (by this time) has a significant amount of condensation, the Polyiso does not show any condensation.
The details link up above has closeups and more detail on how long it took each kind of insulation to form condensation.
The Thinsualte and Wool do behave differently - the wool (it appears) absorbs some of the moisture in its fibers and this delays the formation of condensation compared to the Thinsulate. This may or may not be an advantage depending on what you think about the insulating material absorbing moisture -- some would feel this is not a good thing.
Weighing the batts for moisture absorption:
I weighed each of the insulation at start of test (dry), and after a nights worth of humid conditions (max moisture), and then again after a drying period.
The table below shows the results on moisture pick up for each insulation.
Hopefully the table does not get mangled by the forum software, but each insulation performs differently.
Polyiso does not absorb any moisture throughout the whole test.
Thinsulate absorbs 11 grams of water in the batt, and manages to dry all but 1 gram out during the drying period.
Wool absorbs 36 grams of water in the batt, and manages to dry 22 grams out during the drying period, but still retains 14 grams at the end of the drying period. This raises the possbility that there will be less capacity to absorb moisture the next night.
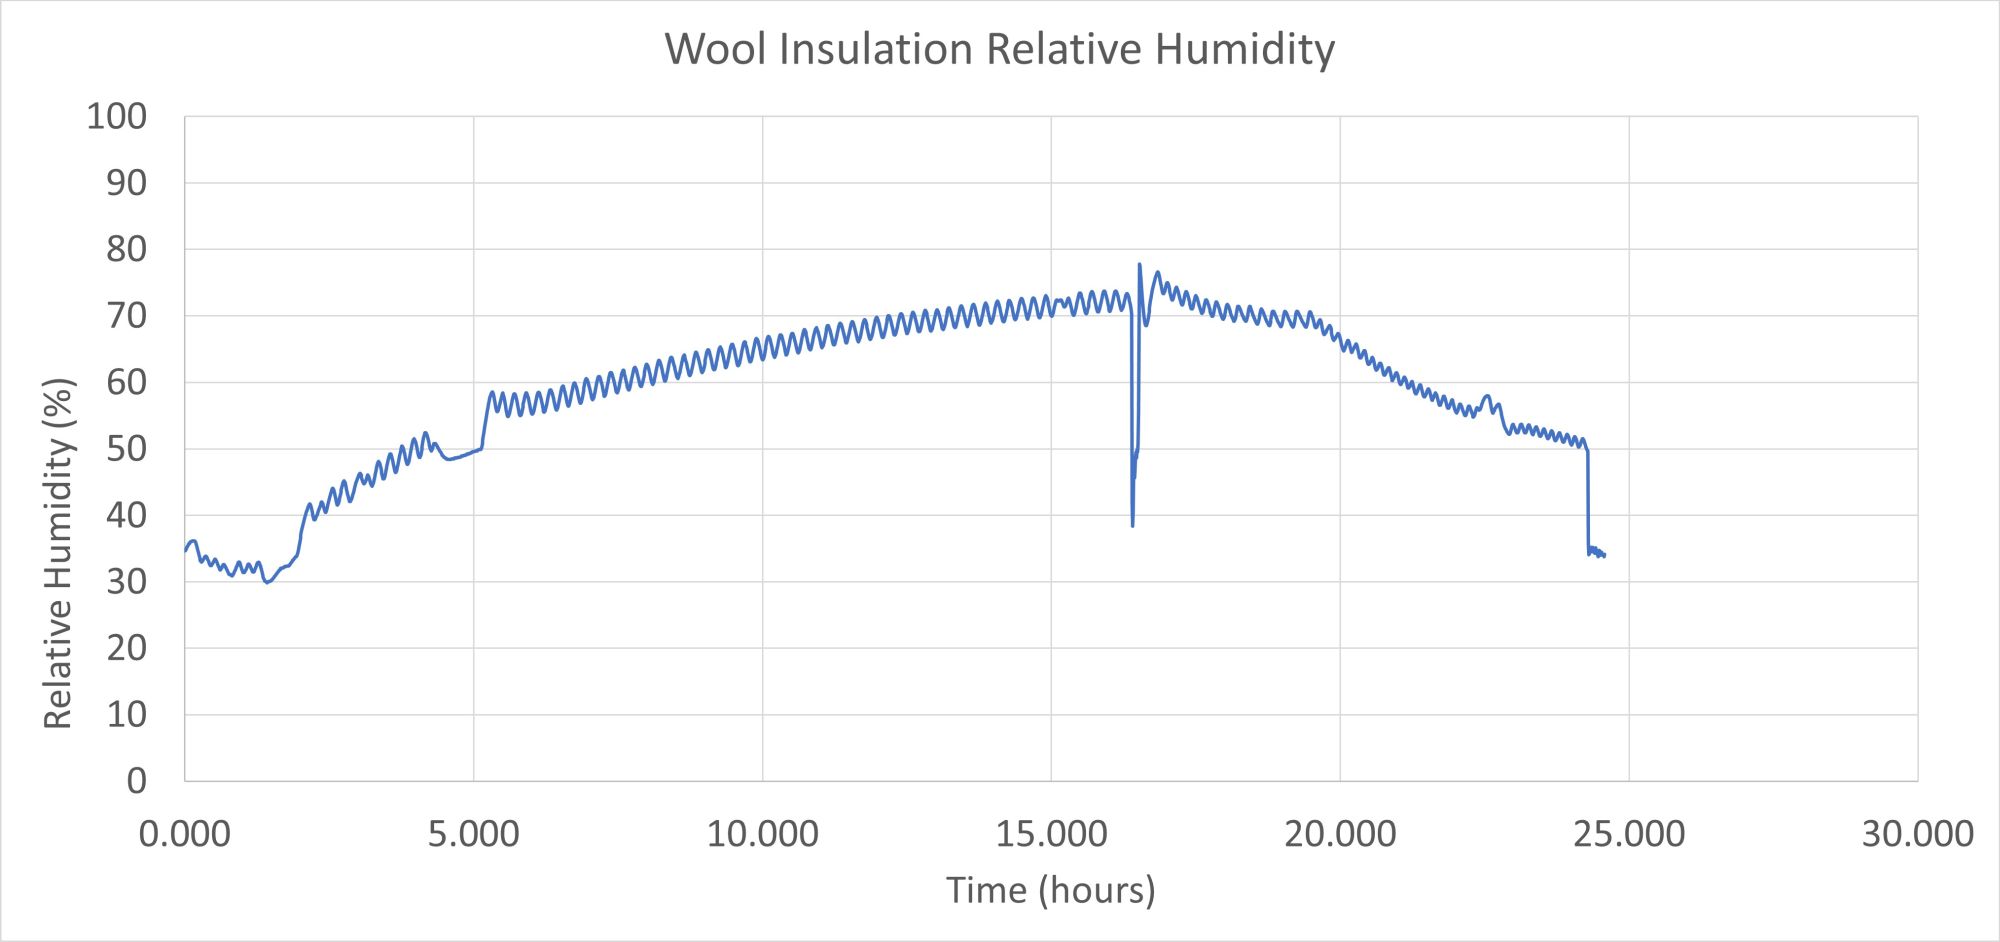
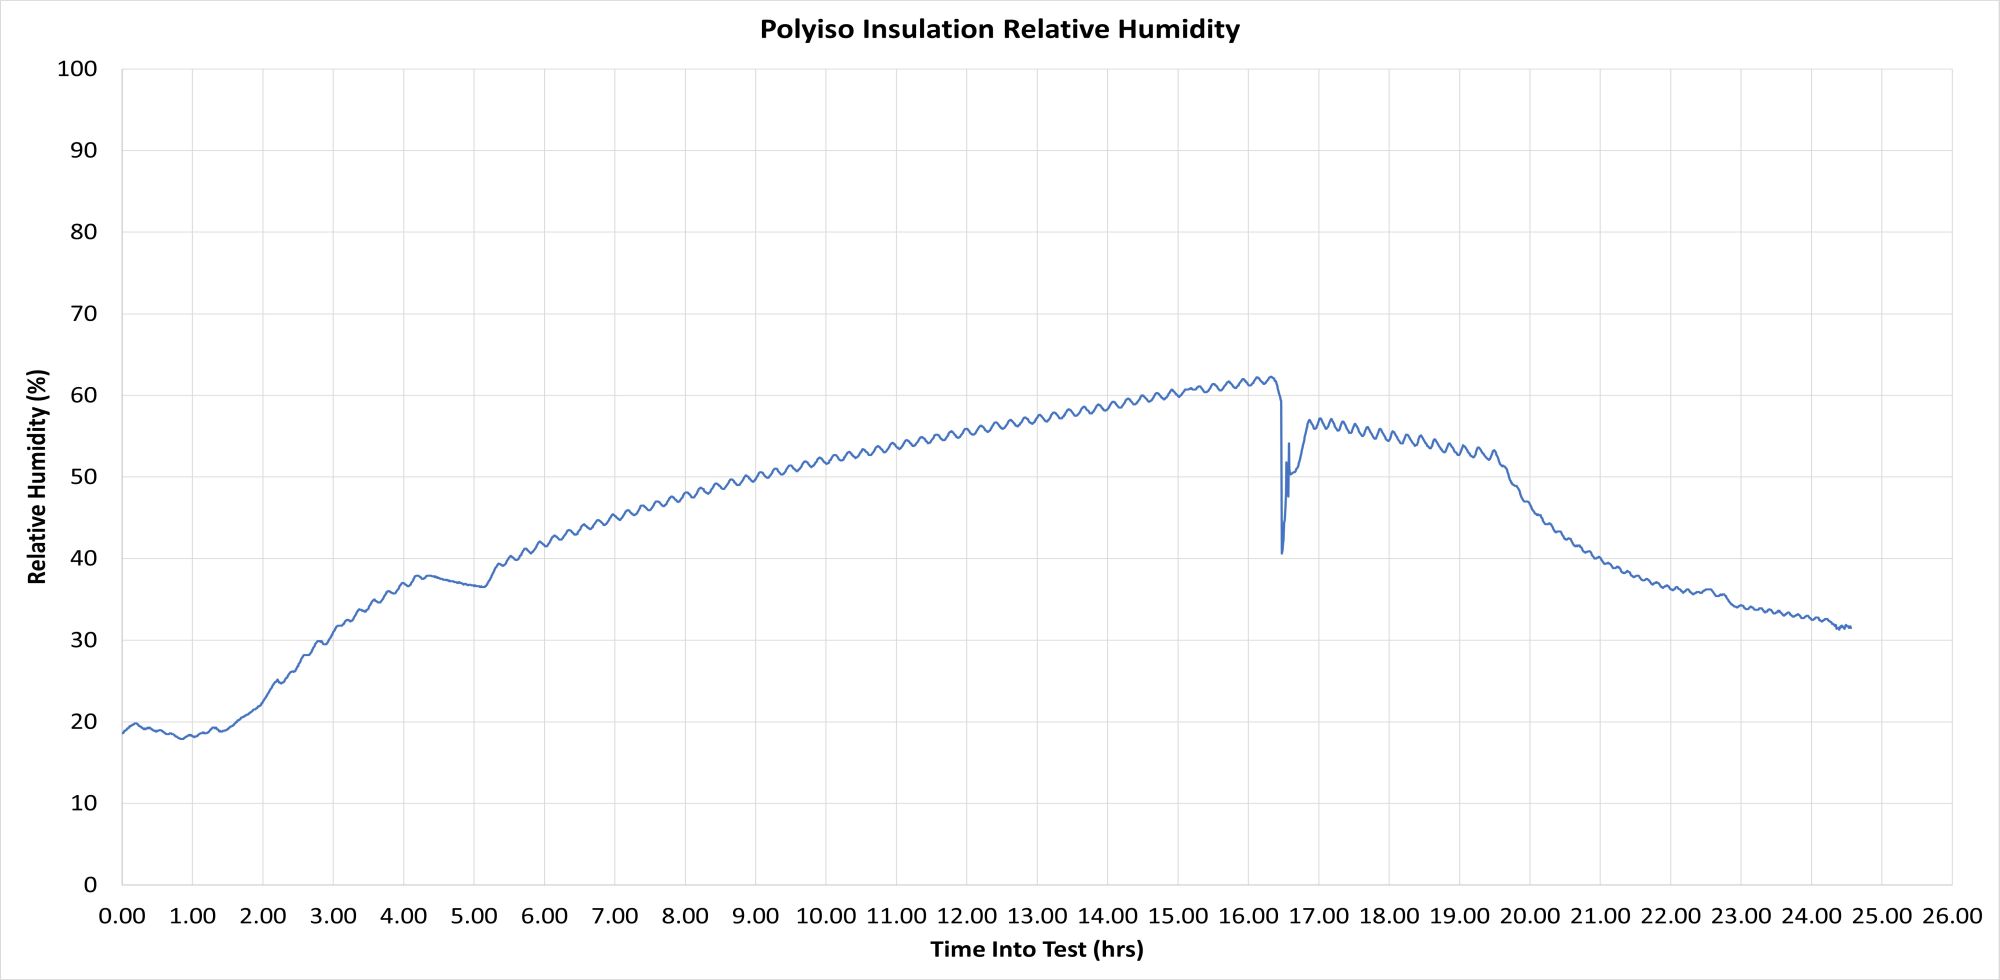
Humidity Level in Batts:
I put a humidity logger half way into the thickness of each of the insulation - the next three pictures show humidity levels in the middle of each insulation batt for the test...
Wool:
![Image]()
Thinsulate:
![Image]()
Polyiso:
![Image]()
They do behave differently.
The Thinsulate rapidly rises to a high level and then stays there for the duration.
The Wool rises more gradually, but eventually gets to about the same high level.
The Polyiso gradually rises to a lower max level. But, not sure the Polyiso readings are that valid in that the way the humidity level is measured probably allowed a bit of air to leak into where the sensor was.
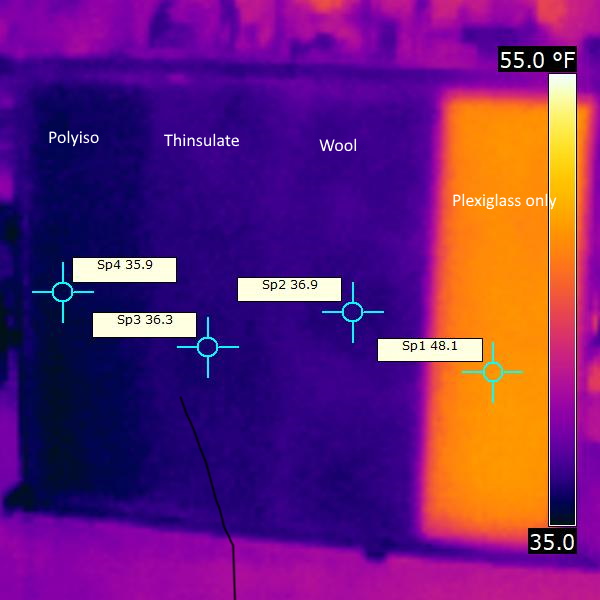
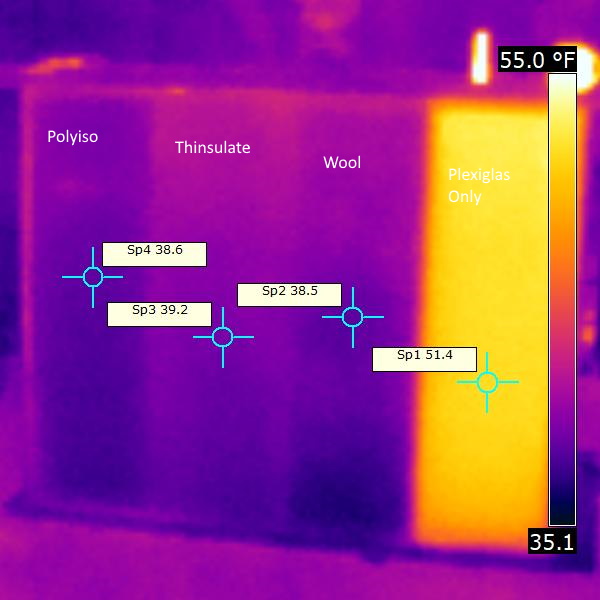
Thermal Performance IR pictures:
I wanted to get a rough idea if the condensation that forms in the fiber insulations reduced R value, so took IR pictures when the insulations were dry and then again after a nights worth of condensation.
This is the dry IR picture:
![Image]()
and, this is the picture after 14 hours of condensation:
![Image]()
Not a whole lot of difference, so I'd say the condensation in the fiber insulations does not degrade R value too much (surprising to me).
Conclusions:
First, I would encourage everyone to read over the test details and see what they mean to you in your situation.
Beyond that, here are a few things that seem pretty obvious…
Again, much more detail here: Insulation Testing – For Van Conversions – Build A Green RV
Also have a mold test going, which is explained at the link.
Gary
I used this test box in which the temperature and humidity can be controlled. It has 4 bays that allow insulation samples to be installed and their performance compared side by side.
For this test, left to right, its Polyiso, Thinsulate and Wool plus bay with no insulation.
Mostly I was testing for how the insulations handle moisture and condensation, but also some IR pictures to compare thermal performance and have also started a mold test.
This is quite a bit of data and all the details are here: Insulation Testing – For Van Conversions – Build A Green RV
But, some highlights below...
The first test compares Wool, Thinsulate and Polyiso.
The parameters that are measured and logged during the test are:
- Temperature and relative humidity inside the box
- Temperature and humidity outside the box
- Humidity in the middle of each insulation sample
- Initial and final weights of each insulation sample (to measure moisture accumulation)
- Thermal camera pictures for rough assessment of thermal performance
Generally a test run starts by weighing and then installing each insulation sample in its own bay. Then the inside of box temperature and humidity are set on the controller. The test is then run for a time roughly equal to a night in an RV. Photos and IR pictures are taken once in a while during the test to record condensation levels and see if there are any changes in thermal performance. At the end of this period, the insulation samples are weighed to get water pickup, and then quickly reinstalled. Then the humidifier is turned off while the heater is left on, and ventilation is increased to get a warm and dry environment in the box for drying. The test then continues until all of the insulation samples have dried out, and a final weight of each sample is taken.
Condensation:
The main goal of the test was to see how much condensation forms for the different insulation types both on the cold van wall and in the outer layers of the insulation. To test this, the box was kept at 70F and 70% relative humidity for about 14 hours - kind of a typical camping night. Outside temperature was about 40F.
The front wall of the box is made from Plexiglass so that the condensation can be directly observed.
Here is one set of pictures that shows the extent of condensation near the end of the test.
This is the Plexiglass with no insulation and the Wool insulation:

Plexiglass on right and wool on left.
This is the Thinsulate and Polyiso at the same time:

Thinsulate on right and Polyiso on left.
The Plexiglass of course forms lots of condensation (like a window on the van), the Thinsulate is next with quite a bit on condensation on the Plexiglass and in the outer part of the Thinsulate batt, and the Wool also (by this time) has a significant amount of condensation, the Polyiso does not show any condensation.
The details link up above has closeups and more detail on how long it took each kind of insulation to form condensation.
The Thinsualte and Wool do behave differently - the wool (it appears) absorbs some of the moisture in its fibers and this delays the formation of condensation compared to the Thinsulate. This may or may not be an advantage depending on what you think about the insulating material absorbing moisture -- some would feel this is not a good thing.
Weighing the batts for moisture absorption:
I weighed each of the insulation at start of test (dry), and after a nights worth of humid conditions (max moisture), and then again after a drying period.
The table below shows the results on moisture pick up for each insulation.
| Insulation | Starting Weight (grams) | End humid period (grams) | Humid period gain (grams) | End drying period (grams) | Gain over test (grams) |
|---|---|---|---|---|---|
| Wool | 768 | 804 | 36 | 782 | 14 |
| Thinsulate | 640 | 651 | 11 | 641 | 1 |
| Polyiso | 270 | 270 | 0 | 270 | 0 |
Hopefully the table does not get mangled by the forum software, but each insulation performs differently.
Polyiso does not absorb any moisture throughout the whole test.
Thinsulate absorbs 11 grams of water in the batt, and manages to dry all but 1 gram out during the drying period.
Wool absorbs 36 grams of water in the batt, and manages to dry 22 grams out during the drying period, but still retains 14 grams at the end of the drying period. This raises the possbility that there will be less capacity to absorb moisture the next night.
Humidity Level in Batts:
I put a humidity logger half way into the thickness of each of the insulation - the next three pictures show humidity levels in the middle of each insulation batt for the test...
Wool:
Thinsulate:

Polyiso:
They do behave differently.
The Thinsulate rapidly rises to a high level and then stays there for the duration.
The Wool rises more gradually, but eventually gets to about the same high level.
The Polyiso gradually rises to a lower max level. But, not sure the Polyiso readings are that valid in that the way the humidity level is measured probably allowed a bit of air to leak into where the sensor was.
Thermal Performance IR pictures:
I wanted to get a rough idea if the condensation that forms in the fiber insulations reduced R value, so took IR pictures when the insulations were dry and then again after a nights worth of condensation.
This is the dry IR picture:
and, this is the picture after 14 hours of condensation:
Not a whole lot of difference, so I'd say the condensation in the fiber insulations does not degrade R value too much (surprising to me).
Conclusions:
First, I would encourage everyone to read over the test details and see what they mean to you in your situation.
Beyond that, here are a few things that seem pretty obvious…
- Judging by thermal pictures, all of the insulation types tested do insulate! And, it appears that for the level of condensation in this test, the insulating properties (R values) are not strongly effected by the condensation (which surprised me).
- Both of the fiber insulations (wool and Thinsulate) do allow water vapor to penetrate and condense both in the outer layers of insulation and on the van wall. The Polyiso with sealing around the edges did not let water vapor penetrate and does not condense water on either its outer or inner face.
- The wool appears to have less visible condensation than the Thinsulate – probably due to some of the water being absorbed into the wool itself. Havelock calls this moisture management, but others would say that having insulation absorb water into its fibers is just not a good thing. Take your choice
Again, much more detail here: Insulation Testing – For Van Conversions – Build A Green RV
Also have a mold test going, which is explained at the link.
Gary


