Ram Promaster Forum banner
21 - 40 of 85 Posts
Discussion starter · #22 ·
Link to those ball catches?
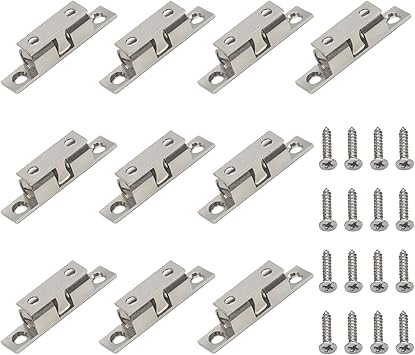
They're generic "42 mm" and "70 mm" ball catches from amazon, like these:


I used the small ones for the drawers (one per side) and the large ones for the doors. I probably could have used 50 mm ones for the drawers, I wanted to make sure they fitted between the cabinet side and the drawer box.

Image
 
Discussion starter · #23 ·
Looks Great @Pierre O 👍 !!
Thanks @RV8R - we're quite happy with the results and it's been a very satisfying project. It's been fun to make mechanics, electricity and woodworking serve our main hobbies rather than just compete for time 😊.
 
Discussion starter · #24 ·
Our next step was to start insulating. By that time we had already camped a few times, in low temperatures around the freezing point, and we knew that even at these temperatures a 1500W space heater could not keep up with no insulation. (Our gasoline heater was not installed yet so we reserved sites with electricity and used a space heater).

For insulation we used Thinsulate. I know insulation is (another!) controversial subject in van conversions; I don't mean this to be a recommendation to use thinsulate or a suggestion that it's better. We saw that some people had used it successfully in similar use cases as ours and it fitted well with our "usa as we build" model.

We used around 60 linear feet overall, and 3 cans of 3M 90 adhesive. Of course I had already insulated behind the galley and electrical panel; I continued with the walls:

Image


And ceiling:

Image


Since we knew that we would be driving around without the finished ceiling, I added baler twine to ensure the ceiling pieces would stay in place.

I also insulated the top of the cabin, the slider and rear door panels, and stuffed most of the pillars, including the cavities at the top. I finished the top of the doors with ABS panels held in place with push retainers (I got the retainers from Grainger; they have a good selection, including metric sizes):

Image


I later completed the insulation as I paneled the walls; at least for now it was enough to continue our camping season into winter.

You can see also the temporary window covers I made with reflectix. They are just held in place with magnets on the metal frame. These worked OK for us until I made permanent window covers later.
 
Our next step was to start insulating. By that time we had already camped a few times, in low temperatures around the freezing point, and we knew that even at these temperatures a 1500W space heater could not keep up with no insulation. (Our gasoline heater was not installed yet so we reserved sites with electricity and used a space heater).

For insulation we used Thinsulate. I know insulation is (another!) controversial subject in van conversions; I don't mean this to be a recommendation to use thinsulate or a suggestion that it's better. We saw that some people had used it successfully in similar use cases as ours and it fitted well with our "usa as we build" model.

We used around 60 linear feet overall, and 3 cans of 3M 90 adhesive. Of course I had already insulated behind the galley and electrical panel; I continued with the walls:

View attachment 102577

And ceiling:

View attachment 102580

Since we knew that we would be driving around without the finished ceiling, I added baler twine to ensure the ceiling pieces would stay in place.

I also insulated the top of the cabin, the slider and rear door panels, and stuffed most of the pillars, including the cavities at the top. I finished the top of the doors with ABS panels held in place with push retainers (I got the retainers from Grainger; they have a good selection, including metric sizes):

View attachment 102581

I later completed the insulation as I paneled the walls; at least for now it was enough to continue our camping season into winter.

You can see also the temporary window covers I made with reflectix. They are just held in place with magnets on the metal frame. These worked OK for us until I made permanent window covers later.
Hi,
Our "temporary" Reflectix window covers made in 2014 are still in use :)

Nice that you are getting use out of van during the conversion - A good way to go I think.

Gary
 
Discussion starter · #26 · (Edited)
Hi,
Our "temporary" Reflectix window covers made in 2014 are still in use :)

Nice that you are getting use out of van during the conversion - A good way to go I think.

Gary
Thanks. Certainly we had waited enough that we wanted to use it asap but also it is a good way to easily spot "mistakes" and correct as you go along.
 
Nice job Pierre! I may copy your cabinet locks as the heavy duty magnets I used are "okay" but if we hit gravel or bumpy roads I dont think they will hold and Alaska is in the plans....
 
Discussion starter · #28 ·
The next step was to finish the ceiling. Not much new to contribute as I mostly borrowed @MsNomer 's approach, with a couple minor tweaks.

First I attached the furring strips. I used pine 1x3s that I ripped to 1/2 inch. On our van the rib above the C pillar was actually slightly lower so I ripped this strip to 3/8". I have no idea if all Promasters share this trait but this rib is visually different.

I kerfed the strips to they would be flexible and attached them with flat head socket screws and rivnuts:

Image


For the front and back I copied @MsNomer , except I used L brackets for the back support. They will be covered with trim later.

For the ceiling and walls we chose 3", 5/16 thick pine T&G. We liked the look and it was cheap, about 1$ CAD a square foot. Plus compared to plywood there is very little waste.

For the ceiling we chose to apply a clear satin finish. We did not want tons of wood but felt the ceiling and countertops would give the feel we were after. We finished the boards outside the van, in our dining room.

We started from the center:

Image


Quick note: the rear doors and the metal above are not symetrical so don't rely on them to align your ceiling...

Once we got to the right rows we installed the requisite "vanlife" puck lights:

Image


Actually we really like them. We have the ones over the bed controlled by a separate switch and dimmer from the front ones. I like to read on the bed, lying on my side with the book on the bed, and this gives perfect lighting with no shadows.

We used 3000K lighting throughout as we find it more cosy than colder lighting. In such a small open space I find having a single temperature helps give a more "finished" feeling.

I used these dimmers:

Image


They work OK and have a good range of adjustability. I wired a switch in series with each dimmer because I hate having to turn a knob on or off. This works well for us. I used these switches: https://www.digikey.ca/en/products/detail/e-switch/RR3112ABLKBLKNFF0/1589375. They're not rated for DC but I could not find any that we liked and 1 amp should not kill them. I mounted the switches and dimmers on blank residential plates that I drilled:

Image


It's cheap and we like the look. They are attached to the wall with low voltage wiring brackets; the plywood is just temporary.

For lighting I used leftover 16 AWG speaker wire. I know some people are dead set against it but I had it and it's already way better than the 22 AWG crap that the puck lights come with.

This is the completed ceiling:

Image


You can notice where the upper cabinets will go. I attached a 1x4 with rivnuts and put t-nuts in it. Another 1x4 is attached to it and will eventually become part of the upper cabinet.

You can see that I left a gap at the front. I wanted to be able to remove the headliner for service if necessary. I may add a trim piece eventually; for now I put foam weatherstripping to insulate and prevent condensation.

The bungee cord across is just a clothes line. Since then I put a series of eye hooks at the front and at the C pillar to attach bungee clothes lines and we constantly use them.
 

Attachments

After 13 months of waiting, in October 2022 our van finally showed up at our dealer:

View attachment 102294

Since we had waited so long, our goal was to be able to use the van throughout the build. That did condition the sequence but also some of the design choices. I was also able to use the waiting to prepare and pre-build some of the subassemblies.

The first step was the flooring. We had already bought a vanrug mat, on the premise that it might serve as a temporary flooring. Using it as a template, I was able to pre-cut 1/2" polyiso and 5/8" exterior T&G plywood, and the flooring went up very quickly:

View attachment 102296

I bolted the plywood + polyiso + vanrug sandwich using the d-ring holes and I filled the cracks with surface finishing underlayment.

We chose a good quality textile backed sheet vinyl, on the recommendation of our flooring store. She was confident it would fare well in our temperature extremes. I glued it down with Mapei ECO 350 adhesive, and our flooring was done!

View attachment 102297

Next was the fan. Plenty of people have covered this; we installed it in front. We chose the manual version (6200K), because we did not care for a remote and because I felt it would be easier to feel if it was iced over with the manual crank. I used butyl tape and DAP dynaflex 230 caulking. The wood frame is just held in place with the flange screws.

View attachment 102300

View attachment 102301
I can’t tell but are those covers on the openings along the floor of the van? First I’m seeing them covered up if they are. I assumed most builders/DIYers left them open for breathing to prevent some moisture build up, or if god forbid it leaks it has a place to run down.
 
Discussion starter · #30 ·
I can’t tell but are those covers on the openings along the floor of the van? First I’m seeing them covered up if they are. I assumed most builders/DIYers left them open for breathing to prevent some moisture build up, or if god forbid it leaks it has a place to run down.
You mean the triangle-like covers near the floor? Good question, it came like this from the factory. My understanding from people here is that usually they leave them covered and of course never stuff insulation in?
 
You mean the triangle-like covers near the floor? Good question, it came like this from the factory. My understanding from people here is that usually they leave them covered and of course never stuff insulation in?
The black triangle “rocker space” covers come on new PMs that do not have factory lower wall panels.

IMO, it is best not to stuff insulation down there. Those rockers are used to drain any accumulated water ,,, mostly from the road.

I always recall @RDinNHandAZPinto Story” whenever I think of that cavity;

 
I wasn’t planning to stuff insulation in there, more so lay some pieces of it to prevent drafts. But I had a feeling it might be worth leaving open for water that may enter the van and so air can get in there to help dry out.
 
Discussion starter · #33 ·
I wasn’t planning to stuff insulation in there, more so lay some pieces of it to prevent drafts. But I had a feeling it might be worth leaving open for water that may enter the van and so air can get in there to help dry out.
Sure. Depends on your wall construction though; in our case there is insulation on top and we would not want cold drafts anyway. Whatever works for you!
 
Discussion starter · #34 ·
Our next step was to build the upper cabinets. Whereas the base cabinets are quite easy because everything is square, the uppers take a bit more measurement.

We chose to leave 24" betwen the countertop and the bottom of the upper cabinet. To get the right shape and angles, I made iterative templates, from cardboard first and then masonite, until I was satisfied with the fit:

Image


Then I built the basic box using these templates. The box is bolted to the body rib as well as the roof ribs.

Image


Then I added cabinet backs and doors:

Image


I used friction arms from Richelieu (Duo Flap Stay - Richelieu Hardware) and ball latches. I know many people like the gas struts, but these friction arms are cheap and have adjustable friction. I used regular euro hinges.

Image


As you can see the bottom of the door and sides is lower than the shelf; I wanted to hide the LED strip, and it also allows the ball latches to be under the cabinet and not in the way.

We really like having these cabinets. I made them the minimum depth that would accomodate plates and our toaster; overall with the door the depth is about 13 inches at the bottom. Note that I would definitely not want them to be any deeper, especially given that our base cabinets are only 21" deep, so really the upper cabinets are 4" closer to the edge of the countertop than in a regular kitchen.
 
nice work and write up! We are in the same stage of life but live in tropical S Florida. Our goal, like yours, was all-weather so we can head for the mountains and great white north whenever we need to get out of flatland. We went with blown foam insulation for walls and ceilings, extra 1" of floor insulation (we are not tall so worth it), auto hot pads for all tankage, smart LIFOPO4 BMSs that wont charge below 32F/0C and battery box has auto-heat pad as well. Air Conditioning was not an option (even for the build process) down here in 90-plus humidness so we opted for 24Volt system to drive 3,000 watt inverter (or shore power) and drive a roof mounted RV aircon. With two 280AH 24v batteries we can drive AC for a few days off grid. Worked out well so far though our only cold camping has been Connecticut in the 20s and Nova Scotia which was all over the place weatherwise. The diesel engine tank feeds the diesel heater and works like a champ. Biggest concern is the fuel line freezing so I need a solution there eventually.
Hi Pierre, What make and model air conditioner did you get.

Thanks
Gary
 
The next element is the galley cabinet. Actually I took advantage of the PM's fairly "square" construction and built the cabinet prior to receiving the van.

As usual I started with overall dimensions and planning in Visio:

View attachment 102444
(And yes, even if we use the metric system, I still do carpentry in imperial units. Old habits die hard).

Often when I do this type of design I will use product drawings and will roughly scale them. I am terrible with CAD but I love visio as a sketching tool.

Once I had all the elements figured out, I used OptiCutter (www.opticutter.com) to plan the plywood cuts. The upper cabinet pieces were just roughly dimensioned, with some allowance for final dimensions. Opticutter will optimize the cuts as follows:

View attachment 102445

In our case I needed 4 sheets of 15 mm baltic birch plywood the the cabinets, battery box and wheel well boxes. I don't have a panel saw so I did the large cuts with a skil saw and the smaller pieces on a table saw. I prepared and labeled all the pieces since I prefer to do this outside and it is much more comfortable in the summer!

Then I assembled the boxes using pocket screws and glue:

View attachment 102447

As you can see I built the galley in 2 pieces: the fridge box and the 2 door unit. They will be assembled together in the van. The idea being that if ever the fridge fails and I need to change to a different model I can adapt or redo just this part.

Next I fitted the doors, hardware and drawer faces:

View attachment 102448

At this stage we moved the cabinets to our dining room for painting and finishing:

View attachment 102449

We used a Benjamin Moore "Stix" primer and ADVANCE pearl cabinet paint, applied with a roller and brush. We are quite happy with the finish so far.

The counter is from a 39x74 island countertop that we got from Home Depot. It is Hevea (rubberwood), treated with a mixture of mineral oil and beeswax. We wanted to use a finish that would be food safe and not look like plastic.

Finally we moved the cabinet to the van. I did some minor routing to clear the B pillar.

View attachment 102450

As you can see our water supply (potable and gray) is contained in the cabinet, with a simple Whale Babyfoot pump. The Bison heater also resides in the base of the cabinet. The bottom shelves are just retained with cleats so everything is easily accessible:

View attachment 102451

This was the overall result with the doors and drawers in place:

View attachment 102452

As well as for the battery box:

View attachment 102453

As you can see from the walls (and the clutter) we were actively using the van while doing this. The approach was to try and add the most functional elements first, and leave the "prettying up" for later. It worked well for us.

By the way we used these ball catches for the doors and drawers:

View attachment 102454

I really like the adjustable tension. It takes a bit of getting used to "pulling" and "pushing" the drawers and doors in place but they have good retention and are adjustable.
Nice job. Thanks for posting the photos. Really helps.
 
Discussion starter · #40 ·
The next step of our build was the clothes bins. In yet another inspiration from this forum, we decided to use Ikea Trofast bins for storing our clothes.

Remember that our mode of using the van (at least for now) is part-time, ranging from weekend trips to a few weeks. So packing clothes is part of our travel routine. The beauty of the bins is you can easily take them from the van to the house to pack clothes, and also they can pack a surprising amount of clothes.

I started by buying the bins, ordering the rails from Ikea amd "reverse engineering" the dimensions. Using this I built 2 racks.

The top rack is at our feet over the bed:

Image


Image


Image


I designed it to be an extension of our galley cabinet, both style and dimension-wise. Actually I designed both before I built the galley cabinet, so the fit was intentional. As you can see, what holds the bin in place is a simple bungee cord, fixed at one end and hooked at the other. These are also useful as extra clothes lines.

The bottom rack is a simpler affair, installed over the wheel well. Since the bed is designed to be removable, the rack is bolted to the wall only.

Image


Image


Overall that gives us 6 bins: 1 each for "normal" clothes, 1 each for sports clothes, and 2 for towels, toilet paper and stuff. So far that's been plenty (winter jackets, snow pants, hats and mittens live in fabric tote bags under the bed).

By the way the bin at top left in the last picture is our portable shower, inspired by @MsNomer . The pump, curtain and sous-vide live in the tote box/shower pan.

These bins are much lighter than enclosed cabinets, significantly cheaper (the bins were 7$ CAD each, I got the rails for free from Ikea, and the wood was mostly cutoffs). They were also very easy to make, using mostly the same templates as the galley cabinet.
 
21 - 40 of 85 Posts