Ram Promaster Forum banner

Framing

17K views 12 replies 10 participants last post by  MsNomer  
#1 ·
**** all the curves, protrusions, and so forth in this van..

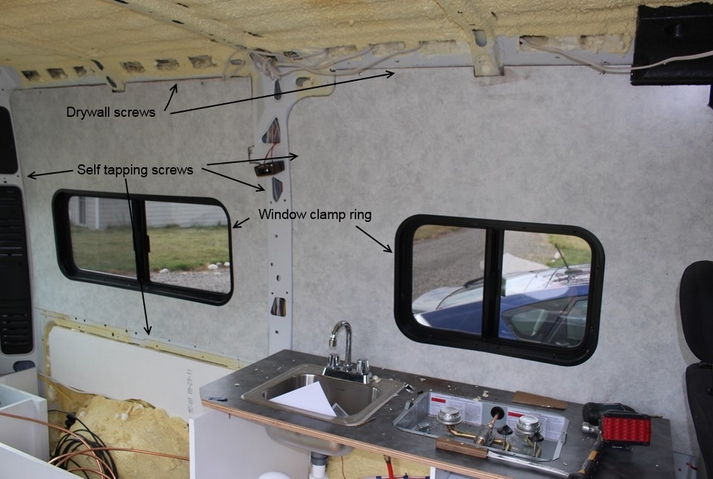
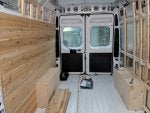
Just laid down my floor, working on wiring and now the most confusing part for me, the framing. Anyone have photos of their framing before they put up all the panels for wall covering? I need ideas, ideas, ideas. I want my finished walls recessed (where my bed will go) towards the inner panels at the back of the van. This will give me an extra 1-2 inches of leg room compared to if I bolt furing strips/framing wood over the metal protrusion (don’t know what to call it) above the tire wells. I hope whatever I just describe makes sense. If anyone has helpful YouTube links I’d appreciate that too. I’ve searched and seen a lot already but still confused on what to do
 
#3 ·
#5 ·
Some add wood strips, some just attach straight to the ribs. I suggest using plus nuts to attach to the ribs. They are less likely to spin and are very strong. You don't need a special tool to attach and for the PM all of mine are attached with 10 complete turns. I use a battery power impact wrench and it is a tool you need to get if you don't already have one. Search "plus nuts" on the forum to get the details.
 
#7 · (Edited)
I recessed the wall panels at the head/foot of my elevated double bed so I could maximize my cross length.

Picture of the recessed panel set against the wall rib (I used 1/8” foam to serve as a thermal barrier). The insulation at the head/foot of the bed consists of a 1/2” air gap, reflectix, 1/2” foam board, and the 5mm wood panel.

Image


The finished product showing the recessed wall panels near the bed.
Image


Image


More info and pictures are available on my build site at www.vancave.wordpress.com... the recessed panels are on my VanCave2 build.
 
#9 ·
I used furring strips, it seemed like the best way to hang tongue and groove wall paneling. I didn't make any recesses but you could still frame them in if you decide to use furring strips. I used self-tapping screws to attach the strips to the van and a pocket hole jig to add horizontal pieces where needed.
 

Attachments

#11 ·
I need to start putting up my walls soon and still trying to figure out the best method. I pretty much know what I am doing for the garage walls and sleeping area. I already cut out 5mm plywood to fit around the wheel wells and separate pieces that will have foam glued to them and fabric wrapped around them that will be the walls for the sleep area. I am thinking of using some .5-.75 inch think furring strips to extend past that odd support beam that sticks out and I will use 5mm for the walls for the kitchen and living area. I should have the furring installed some time this week because I need to work on my wetroom.
 
#12 ·
It is hard to figure out the best methods.

Here is an example of what I did. I do not have any “furring” strips. Sometimes it is difficult to place in order the tasks. For my ceiling, walls, & floor I did things in this order;

1) cut & installed all items into ceiling, walls & doors, & floor (roof fan, shore power, windows, etc)
2) design attachment method (I decided on rivnuts & bolts & nuts). Installed rivnuts
3) fabricate ceiling, wall panels
4) insulate ceiling & walls
5) install ceiling & wall panels
6) fab, install, floor insulation & floor panels (thru bolt by drilling up thru metal van floor thru insulation & plywood floor & bolt down)

For behind panel electrical lines, I installed between tasks 3 & 4 above.

I did not want to use wood furring & I attached my panels directly onto the metal van structure mostly with rivnuts. It is “easier” to use wood furring & wood screws as you do not have to locate rivnuts on a 4x8 sheet of panel (or smaller panels).

There are pros & cons to all methods/designs