Ram Promaster Forum banner

Which plan did you sign up for?

Starlink Mini Mounting and Power - How did you install yours?

2 reading
8.4K views 84 replies 17 participants last post by  Lolaeliz  
#1 ·
The Starlink Mini kit normally $499 is on sale for $299 until May 28 2025.

We just ordered ours and are already thinking about how to install and power it up. Starting this thread for others to post how they installed and powered theirs. So we can all benefit.

We will definitely post pics of our install/mounting etc. and how we’re powering it.

We would like to have the option to use it on top of the dash but also run the long cord outside. Perhaps even roof mount it. Haven’t decided yet. Thanks in advance for posting pics, links to things you used!
 
#2 ·
I think there is another thread on this.

I haven't mounted mine yet. Line of sight is important for signal. So if you mount it on your van and park in shade you will have signal issues. The angle and orientation of the dish are less important than line of sight.

So far I have just set the dish either on the ground or on the roof when in use. It can also work through the windshield if it has line of sight.

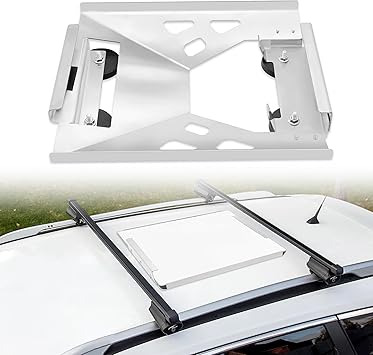
If you want to use it in motion it would be best to have it mounted to the roof.

I have just ran the wire through a window or door for now.
 
#7 ·
I think there is another thread on this.

I haven't mounted mine yet. Line of sight is important for signal. So if you mount it on your van and park in shade you will have signal issues. The angle and orientation of the dish are less important than line of sight.

So far I have just set the dish either on the ground or on the roof when in use. It can also work through the windshield if it has line of sight.

If you want to use it in motion it would be best to have it mounted to the roof.

I have just ran the wire through a window or door for now.
Yes line of sight is critical. That’s why we want the option to have it inside or outside. Maybe a waterproof port on the van rear bumper or something. The roof would be good for travel I’m guessing.

and whoops your thread is here 🤪🤣
 
#3 ·
I have the Roam 10GB plan, $10 a month, $1 per GB after that. It is intended to be a backup to cell coverage. I am fine with that. If I use 50GB, it's still only $50, same as the 50GB plan. If I use 20GB, it is $20, cheaper than the 50GB plan.

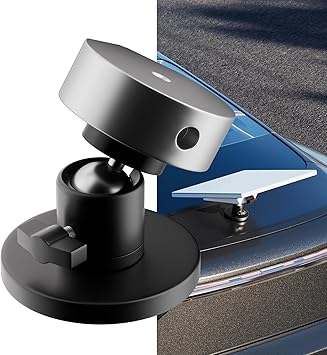
I have a magnetic roof mount. $67 on Amazon. Works perfect.


I use a custom 16AWG cable, also on Amazon. I cut the 12v plug off and wired it to my 12v fuse panel.

 
#6 · (Edited)
I think there is another thread on this.

I haven't mounted mine yet. Line of sight is important for signal. So if you mount it on your van and park in shade you will have signal issues. The angle and orientation of the dish are less important than line of sight.

So far I have just set the dish either on the ground or on the roof when in use. It can also work through the windshield if it has line of sight.

If you want to use it in motion it would be best to have it mounted to the roof.

I have just ran the wire through a window or door for now.
I have the Roam 10GB plan, $10 a month, $1 per GB after that. It is intended to be a backup to cell coverage. I am fine with that. If I use 50GB, it's still only $50, same as the 50GB plan. If I use 20GB, it is $20, cheaper than the 50GB plan.

I have a magnetic roof mount. $67 on Amazon. Works perfect.


I use a custom 16AWG cable, also on Amazon. I cut the 12v plug off and wired it to my 12v fuse panel.

Nice! I added that plan to the survey above.

edit : We already know we will use 100GB a month so the unlimited made sense…
 
#8 ·
We adhere it to the front windshield using a simple Amazon product that uses suction cups. See the picture below. We intend to keep it on the windshield when driving long distances without cellular connectivity to run our GPS

We power it with Starlink’s own cigarette lighter device and its 5 meter cord

So far the windshield mount has worked in every campsite except one. And for that one we just moved the Starlink mini outside and left it on the ground below a clearing in the trees

Image
 
#33 ·
I like this idea. and I found it here: https://www.amazon.com/ACNOYEL-Star...=&hvdev=c&hvdvcmdl=&hvlocint=&hvlocphy=9006986&hvtargid=pla-2281435177658&psc=1

Can you drive safely with it on the windshield? Do cops care? It's a big windshield, so I guess it's okay, I'm just wondering about your experience.

Also, you got the DC plug off of the starlink site? I believe it's got a usbc connector. Are you happy with that choice? I'm thinking the cigarette lighter plug might work better for the cab area.
 
#10 · (Edited)
We will use the mini in 3 possible locations :

1 - suction cupped inside to the windshield
2 - outside on the ground up to 50 feet away
3 - magnetic mount to the roof

Power will be from a 12vdc to 24vdc 120Watt buck boost converter due to voltage drop especially with location 2.

I ordered this converter :
Image
 
#11 ·
For those who've been tracking prices with these, as I haven't, is the $299 price an anomaly or a regular occurrence. Also, any issues with using in BC Canada?
 
  • Like
Reactions: kenandlinmarie
#12 · (Edited)
I'm not sure about the price being an anomaly. In 3 days though it will be back to $499. This is what Google says about BC -

Yes, U.S. Starlink service does work in British Columbia and Alaska. Starlink offers a roaming service, allowing users to take their Starlink equipment and service into other areas, including Canada and Alaska. Specifically, with a roaming plan, you can use Starlink in Canada and Alaska for a period of time, although there may be limitations on the duration of use. To activate roaming, you'll need to have a valid U.S. Starlink account and an eligible Starlink plan.
 
#15 · (Edited)
Just wanted to update you on our Starlink Mini install.

We installed the 12 to 24v transformer above and added about 15 feet of 12awg wire to an outside socket.

We're happy to report that plugging in the 50 foot cable powers up the Starlink just fine. That's 24v over a 65 foot length!

Image

Image

Image

Image


So that will be nice when we need to mount away from the van in the woods or something.


Here is the waterproof socket I used on our bumper if anyone is interested. Didn't use plugs that came with it but nice to have them.

Image


We also bought this shorter 15 foot cable and it also works fine plugged into 12v. Using that when the mini is sitting above the dash.


No roof mount yet but we'll update when we do.

And oh by the way... This Starlink Mini works great! Thanks everyone at the meetup for suggesting it. (y) :D

Here are stats just driving down the highway.


Image


Image
 
#16 · (Edited)
Update.

On 12V we're noticing a buzzing sound coming from the Mini. It sounds almost like an old modem. Not super loud but annoying if you're not deaf like me. Just ask Starshine :LOL:

Running it at 24v fixed this problem!

So I think I will run another wire off the 24v transformer up to the cab where the Mini sits in the dash. I'll also add a rocker switch so we can switch off the 24v transformer/Starlink when not in use.

It's possible that shortening the 12v cable might also fix this problem but I like the idea of using just ONE power source on a switch. And I bet this runs better on 24v anyway!
 
#22 ·
#24 ·
All you bad people convinced me to buy the Starlink Mini to take advantage of the $299 deal.:D

Image


I bought the "Stargear" magnetic mount and also their 16 foot DC cable from Amazon - both were impressive quality wise, even the packaging was well done.

I ended up running the power cable up through my brake light assembly, which is now completely full and if I need to run anything else up there it will require a hole in the roof. I cut the cig lighter plug off and wired it in. No issues running the on 12 volts (13.4 actually), and no voltage drop at the business end. I didn't hear any buzzing. This cable is nice, pure copper 16 gauge and the jacket seems like it will stand up to the elements.

Not sure if will make a difference, but I used some 3M VHB tape to stick a tie-ring to the roof and a heavy duty tie wrap to tie down the mount - just to keep it from moving around when under speed. These magnets are darned strong, so it may not be necessary - I may change the tie wrap for a piece of cable to make it a little harder to steal, but you can't even see this from the ground.

Performance is good even though it is pointed West in our driveway. Pointing it North does double the throughput, but it is still plenty fast and this will be our backup Internet for the home for now on the 50Gb plan.
 
#26 ·
It's at the rear of the van - I left that little quadrant at the rear driver side open for mounting something like this. It is using a magnetic mount, so the plan is to take it off if needed and use the AC power supply and long cable that came with the unit to relocate the dish to a clear area. I have a small 300W inverter just for these kinds of power supplies / chargers, etc. so I wouldn't need to use my 2000W inverter just for this.

Couple of challenges with this, however - This morning I got up to the van roof and tried to move the dish and the magnets are so strong that it felt like I was going to break the mount. This may have been that I was using a shorter ladder and could not get the best leverage on it, but I will need to figure out the best technique for taking this off if I want to relocate it temporarily - I'll probably need to use my longer Thule ladder to be able to get a good hold of the unit. (would need to use this ladder anyway if on the road)

The other challenge is the little security tie strap I am using - I need to cut it to remove the dish - I need to find a weatherproof small cable lock to use for this that could be unlocked and reused.

In all practicality, if we were camped somewhere without Starlink access due to trees, but we had cell phone access, we would probably not bother relocating the dish unless we were going to be stationary for a while. Our plan is to be able to use this to work remotely sometimes, and if we needed to do that we'd probably find a parking spot that was in the open, but I know that might not be always possible. Modern day problems...:)
 
#31 ·
All you bad people convinced me to buy the Starlink Mini to take advantage of the $299 deal.:D

View attachment 117324

I bought the "Stargear" magnetic mount and also their 16 foot DC cable from Amazon - both were impressive quality wise, even the packaging was well done.

I ended up running the power cable up through my brake light assembly, which is now completely full and if I need to run anything else up there it will require a hole in the roof. I cut the cig lighter plug off and wired it in. No issues running the on 12 volts (13.4 actually), and no voltage drop at the business end. I didn't hear any buzzing. This cable is nice, pure copper 16 gauge and the jacket seems like it will stand up to the elements.

Not sure if will make a difference, but I used some 3M VHB tape to stick a tie-ring to the roof and a heavy duty tie wrap to tie down the mount - just to keep it from moving around when under speed. These magnets are darned strong, so it may not be necessary - I may change the tie wrap for a piece of cable to make it a little harder to steal, but you can't even see this from the ground.

Performance is good even though it is pointed West in our driveway. Pointing it North does double the throughput, but it is still plenty fast and this will be our backup Internet for the home for now on the 50Gb plan.
I am definitely thinking about a bicycle or motorcycle helmet lock with a shorter cable - there are a bunch of these on Amazon and I will try to figure out which one will work.

I am concerned about breaking the dish. These magnets are strong and even though the mount is made of cast aluminum there is definitely the danger of it breaking from trying to lift only one or two magnets. As I posted above, I think sliding over to a piece of wood that is fitted in the channel is maybe the way to go. Need to do more testing when I get a chance.
Did you add that “bracket” that the tie wrap is tied to or was that already on your van top? If added, what is it called and where did you get it? Thanks!
 
#32 ·
I used one of these out of a package of 8 that I bought from Amazon:
Stainless Steel Ceiling Hooks Pad Eyes Plate Marine Hardware Hooks

I got these to use to attach to my rack on the passenger side to hang a tarp (idea from another poster on here, I believe @GaryBIS ) but only used 4 for that. This mount, and the ones I put on for my tarp are attached with 3M VHB Tape - I was a bit skeptical of this at first, but if you use an alcohol pad to clean both surfaces, this stuff sticks like nothing I've seen and I think the bracket would break before the tape gave way.
 
#35 ·
We have installed a European mount that changes the flat “receipt holder” on the dash to a raised iPad holder. We put the star link on the windshield so that the iPad holder is between the driver’s eyes and the star link. The view is still panoramic. No issues with law enforcement so far, and I’m not concerned about that
 
#40 ·
This is what the European iPad holder/clipboard looks like. We place the mini Starlink (attached to the windshield using suction cups) low on the windshield and on the passenger side so that the Starlink does not block very much additional windshield space for the driver. Said another way, from the driver’s viewpoint we hid the Starlink behind the iPad

Image
 
#46 ·
Ok so we're experimenting with Velcro holding the dish down onto the dashboard Not a permanent fix or something I'd recommend for a highway drive but perfect for our drives through the campground here in the White mountains of NH.

Horribly misaligned yes. But performance is excellent.

Image

Image

Yeah... messy...

Image


But maybe there's a way to mount to this map holder thingy compartment? We like the dish on the passenger side.

Image
 
#47 · (Edited)
Got my mini up and running today. Used a 12 to 24 volt converter, used my van automation spare relay to switch power and a cheap magnetic holder to attach the antenna to the roof. With home assistant it was literally less than a minute to make an starlink power switch page. Nothing fancy, just on/off.

It's not optimum, having the mini flat on the roof, but it is sure easy.
Image